Painting Vertex Weights
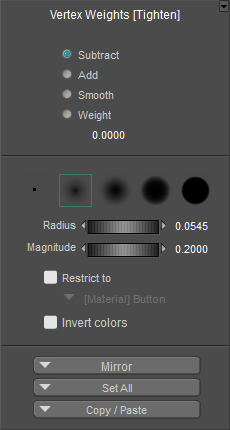
When you click the Paintbrush icon in the Fitting Room, it opens the Vertex Weights palette shown in the following figure.

Vertex Weights palette.
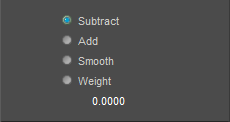
The settings and options in the top section of the Vertex Weights palette are as follows:

Vertex weight painting modes.
- Subtract: Use the Subtract brush to remove or reduce the weight of the vertices that you paint.
- Add: Use the Add brush to increase the weight of the vertices that you paint.
- Smooth: Use the Smooth brush to blend transitions between adjacent areas that have wide variations in the amount of weight applied to them.
- Weight: Use the Weight brush to paint with a specific weight value, as entered in the Weight field.
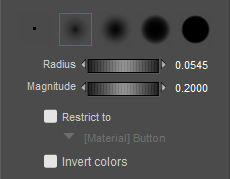
The middle section of the Vertex Weights palette contains five different brush styles, ranging from a very small brush designed to paint single vertices to other brushes that have varying degrees of softness around their edges. In addition, the following additional settings appear here:

Brush options.
Use the harder edge brushes to paint vertex weight on circular objects like round buttons, scale brush size to match the diameter of the button, then set a relatively high magnitude, center the brush over the button and click to quickly paint that button geometry.
- Radius: Controls the size of the brush. Move the slider left or right to adjust the size, or enter a specific value in the Radius text box.
You can increase or decrease the radius of the brush by .0005 each time you press the Up or Down arrow key. Press the Shift key while using the Up or Down arrow key to increase/decrease by .005.
- Magnitude: Controls the strength at which the effect is applied while you paint. Move the slider left to decrease the strength, or right to increase it. You can also enter a specific value in the Magnitude text box.
You can increase or decrease the magnitude of the brush by .0005 each time you press the Left or Right arrow key. Press the Shift key while using the Left or Right arrow key to increase/decrease by .005.
- Group: Check the Group option to isolate the effects of the painting to a specific group. Then select the group from the drop-down menu.
- Invert Colors: Check this option to reverse the color display of the vertices, so that vertices with low values will be displayed green, and vertices with high values will be displayed with darker colors.
The bottom section of the Vertex Weights palette contains controls that allow you to mirror, copy, paste, and set vertices to specific weights.

Mirror, Set, and Copy/Paste weights.
- Mirror: Allows you to copy weight painting from one side of a model to another. This helps save time, by allowing you to paint one side of a model and then mirroring the same values to the other side of the model.
- Set All: Allows you to set all vertices to 0, to 1, or to the value that you have entered in the Weight section in the top of the Vertex Weights palette.
- Copy/Paste: Provides commands that allow you to copy and paste weight values between objects.