Displaying Palettes
Poser’s sleek interface is geared toward streamlining your workflow. You can dock, float, and arrange floating palettes in each of Poser’s different rooms, to set up a workspace layout that meets your needs.
The Window menu contains commands that show or hide Poser’s many palettes. If a palette is hidden, simply select the desired palette from the Window pull-down menu to display it.
The options in the Window > Room Tools submenus are enabled only when the respective room is active. For example, the commands in the Window > Room Tools > Cloth submenu will only be enabled when you are in the Cloth Room.
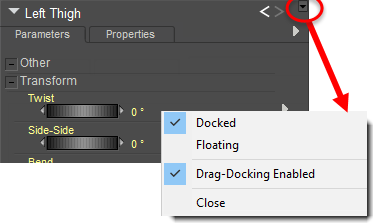
The upper-right corner of each palette contains a Palette Docking Control square. Click the square to open the palette docking menu, which contains commands that work as described below.

Palette Docking menu options.
Moving, Repositioning, and Resizing Palettes
Various controls allow you to resize docked or floating palettes, or reposition them as necessary. For example:

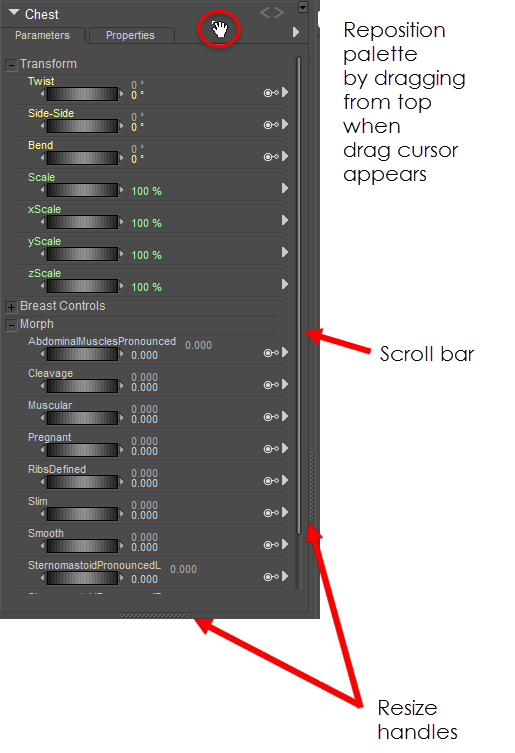
Resizing handles for palettes.
- To resize a docked palette, position the cursor over the resize handle and drag in either direction indicated by the double-arrow resize cursor.
- To resize a floating palette, position your cursor over a side or corner, where it turns into a double-arrow resize cursor. Then drag to the desired size.
- To reposition a palette, position the cursor in the Title area of the palette, where it turns into a hand. Reposition the palette to another area on your screen. If the area that you drag to is highlighted in blue, the palette will dock into the highlighted area of your workspace. If the area that you drag to is not highlighted, the palette will float in the new area when you release the mouse button.
- Some palettes display scroll bars when they contain more information than can be displayed in the allotted space.
- Some palettes (such as the Editing Tools or Display Styles palettes) display options that wrap based on the width of the palette.
- Some palettes cannot be reduced beyond the minimum size required to display all of the palette options and controls. For examples, see the Camera Controls or Light Controls palettes.
Enabling or Disabling Docking
To enable or disable palette docking:
- Click the Palette Docking Control square at the top-right corner of the palette. Check or uncheck Drag-Docking Enabled as appropriate. This selection is checked when docking is enabled, and not checked when disabled.
When Drag-Docking is disabled, you can move the palette anywhere on the screen over the main workspace or to an additional monitor. The palette will always float until you enable drag-docking again.
Docking Palettes
To dock a palette, use one of the following methods:
- Drag the palette toward the area in which you want to place it. When the area becomes highlighted, release the mouse. If you drag the palette into an area that is already populated by one or more palettes, the active docking area will split horizontally or vertically to provide a location for the additional palette.
- Click the control at the top-right corner of floating palette, and choose Docked from the menu. The palette will dock into the position where it was last docked.
Floating Palettes
To float a palette, use one of the following methods:
- Drag the palette out of the docked location, and toward the document window. Release the mouse when there is no highlighted dock location for the palette.
- Click the control at the top-right corner of a docked palette, and choose Floating from the menu. The palette will float in the Poser workspace.
Closing Palettes
To close an open palette, use one of the following methods:
- Click the Close icon in the upper-right corner.
- Click the control at the top-right corner of the palette and choose Close from the menu that appears.
- Choose an open palette from the Window pull-down menu to close it. Palettes that are currently open are indicated by a check mark.