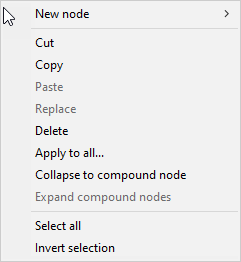
The Material Room Options Menu
You can access the Options menu in one of four ways:
- Clicking the Options menu arrow at the top right corner of the Shader window.
- Clicking either mouse button on a node’s input. In this case, the Options menu will only have the New node option available and may (depending on the input) have quick access options for appropriate nodes to connect to the selected input.
- Clicking either mouse button on a node’s output.
- Right-clicking any blank area in the Shader window.
The Options menu, which varies depending on how it was accessed, has the following options:

Node options.
- New node: Selecting New node creates a new node. Please refer to the following section for more information about creating nodes.
- Cut: Selecting Cut places a copy of the selected node(s) into the Clipboard and deletes the originals from the Shader window along with any existing links between the cut nodes and others. This preserves any links that exist between the copied nodes.
- Copy: Use the Shift key to select multiple nodes and/or the full rote node to copy into the clipboard. Selecting Copy places a copy of the selected node(s) into the Clipboard without removing the originals from the Shader window without altering their relationships with other nodes. This preserves any links that exist between the copied nodes but does not copy links between the copied nodes and other nodes. In conjunction with the Paste command (see below), this is a great way to propagate your shader trees (or any portions you like) from shader to shader, thereby allowing you to save time by leveraging previous work.
- Paste: Selecting Paste places a copy of the node(s) stored in the Clipboard into the Shader window.
- Replace: This is typically used to replace selected nodes in a material with nodes that you have copied into your clipboard. For example, if you create a new shader tree for one material and then want to paste it into another material in your scene, first Select All nodes from the material you want to copy. Then select the material you want to replace. Select All in that material, and then choose Replace.
- Delete: Selecting Delete selected nodes deletes all selected node(s). Any links to or from deleted nodes are also lost, meaning you will need to reestablish broken connections. Please refer to Linking Nodes for information on linking/de-linking nodes.
- Apply to all: Selecting Apply to all... applies all selected nodes to all materials groups in the current object. This overrides existing connections in affected material groups but does not delete any nodes.
- Collapse to compound node: Combines the selected nodes into a compound node. For more information see Collapsing Existing Nodes into a Compound Node.
- Expand compound node: Expands the selected compound node back into its individual node components. For more information, see Expanding Compound Nodes.
- Select All: Selecting Select All selects all nodes in your shader, including the root node.
- Invert Selection: Selecting Invert Selection selects all unselected nodes and deselects all selected nodes. In essence, this function reverses your selection.