Working with Lights
In this topic:
Selecting Lights
You can select lights as follows:
Clicking one of the Lights in the Light Position indicator.
Using the Current Actor pop-up menu.
Creating Lights
To create a light, click the Create Light icon in the Light controls, or click on Create Light in the Light Options pop-up menu. You will be prompted to create a light type (Spot, Infinite, Point, Diffuse IBL or Area).
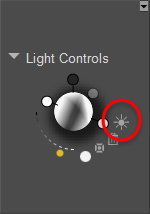
The Create Light icon.
Alternatively, you can choose Object > Create Light and select the type of light from the popup menu that appears.
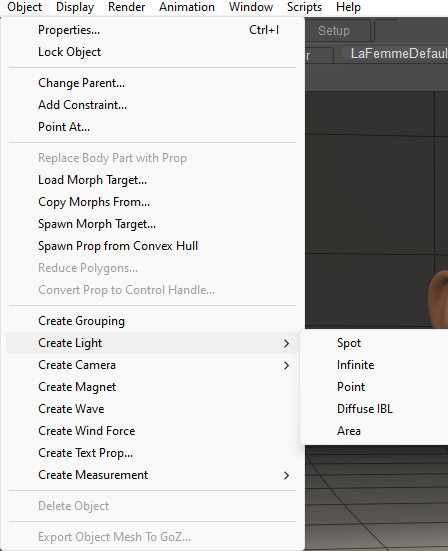
Creating a light with the Object menu commands.
Newly created lights will be created near the origin of the scene. You can move the lights to any location or orientation using the Posing tools.
To change a light to another light type, select the new light and click the Light Properties icon (see Light Properties for information about light properties).
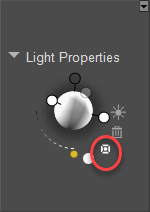
Light Properties icon.
If you select the Diffuse IBL light type, the Texture Manager window will open, and you can choose an image to use for the diffuse IBL. When you select a high dynamic range format (HDR or EXR), the light's material will automatically be configured to serve as an HDRI-IBL. If the image format is any other file type, the light will be configured as a standard dynamic range IBL.
After selecting the image, choose OK. Poser will ask if you want to activate Ambient Occlusion for the light, which is only relevant to FireFly. Choose No to create the IBL light without Ambient Occlusion, or Yes to add Ambient Occlusion. The preview window will update with the lighting changes. For more information on Diffuse IBL lights, see Diffuse_Image-Based_Lights_(IBL).
SuperFly will always calculate light based on realistic light behavior. Therefore, no ambient occlusion is necessary.
Adjusting Light Intensity
You can set a light’s intensity using the Brightness control like a dimmer switch. Click and drag the brightness indicator to the left to dim the selected light, or to the right to brighten it.
You can also set the light’s intensity using the parameter dials in the Parameters palette.
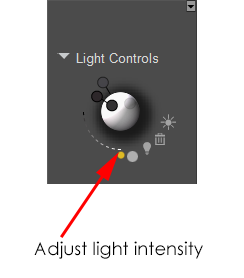
Slide the Light Intensity slider to adjust the brightness of a light.
For image-based lighting, you must adjust the light intensity in the Advanced tab of the Material room. Take care when making these adjustments, so that your results will approximate the realism of the lighting conditions in the image map you have selected.
You can set a light’s intensity to a negative value, thereby creating a “non-light” that will actually darken the affected area(s) of your scene. You can use this feature to create interesting effects.
Light Color
Light colors contribute to your scene’s overall appearance and mood. Unlike paints, light colors multiply instead of mixing and adding to one another. For example, a red figure with blue lighting would appear black, not purple. If you don’t want a light to affect the color of items in your scene, set that light’s color to white or gray. Because of this relationship between scene items and lights, you might want to set your scene items’ colors before setting lighting colors. Note that with image-based lighting, you should generally use a white color, so as not to interfere with the light colors already contained within the image map.
To change a light’s color, click the Color icon in the Light controls to open a standard Color Picker dialog. Make your selection, and your selected light will change to its new color.
Two icons appear in the upper-right corner of the Light Color picker. The first icon opens the Material Editor, where you can add advanced material properties to the light. The other icon opens your standard system color picker.
You can also set a light’s color using the parameter dials in the Parameters palette. For image-based lighting, you can use the Advanced tab of the Material room to plug any image node into the color channel of that light. Doing so will allow you to see the effects of the image-based light on any surface in the Material room, which will give you an exact idea of how those surfaces will be shaded in the final render.
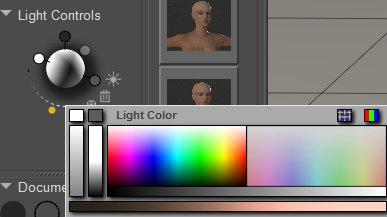
Changing the color of a light.
Delete Light
Select the light you wish to delete and click the Delete Light icon in the Light controls, or click on Delete Light in the Light Options pop-up menu.
Animating Lights
Lights can be animated like other Poser objects using keyframes and tween frames. Please see Animating with Poser for information about animating within Poser.
Saving & Loading Light Sets
You can save light sets to the Library, allowing you to reuse them in later scenes. Light sets have the file extension *.LT2 and are saved to the Lights Library. Please refer to Maintaining Your Library Palette for information about adding items to the Library palette.
Memorizing and Restoring Lights
You can use the Edit > Memorize > Lights command to memorize the settings of the lights in your scene. If you later want to return to those light settings, choose the Edit > Restore > Lights command to restore the settings back to those that you memorized. If you delete lights after you memorize light settings, the deleted light(s) will not be restored.