2D Texture Nodes
These are the color nodes included with the Material room. Unless specified otherwise, the list of attributes for each node is listed from top to bottom.
Contents
Brick
The Brick node simulates brick or stone wall patterns. It has the following attributes:
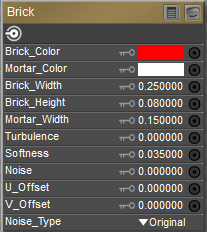
Brick node.
- Brick Color: The Brick_Color attribute defines the brick color. Clicking it opens the standard Color Picker.
- Mortar Color: The Mortar_Color attribute defines the mortar color. Clicking it opens the standard Color Picker.
- Brick Width: The Brick_Width attribute determines the horizontal scale of the bricks.
- Brick Height: The Brick_Height attribute determines the vertical scale of the bricks.
- Mortar Width: The Mortar_Width attribute determines the spacing between bricks.
- Turbulence: The Turbulence attribute defines the low frequency randomness of the brick pattern.
- Softness: The Softness attribute defines how softly the brick blends into the mortar.
- Noise: The Noise attribute defines the high frequency randomness of the brick pattern.
- U Offset: The U_Offset attribute defines the U position of the first texture tile in UV space. When using a projection map method (see below), this is one of two attributes used to define the position of the upper left corner of the projection “screen” in grid units.
- V Offset: The V_Offset attribute defines the V position of the first texture tile in UV space. When using a projection map method (see below), this is one of two attributes used to define the position of the upper left corner of the projection “screen” in grid units.
- Noise_Type: The Noise_Type attribute allows you to select between the Original Perlin type and the Improved enhanced noise definitions.
Image Map (Image_Map)
The Image Map node allows you to specify an image to use as a map (texture, reflection, transparency, bump, displacement, etc.). You can use any image as a map. However, if you want to use a map designed for the particular figure/prop, you must use an image that has been set up to work that way. PThis node has the following attributes:
Poser supports texture resolutions up to 8192 x 8192 pixels. Note, however, that high resolution textures consume a greater amount of system resources.
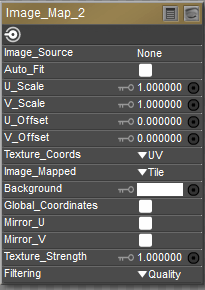
Image map node.
- Image Source: Displays the currently loaded image. Clicking the Image Source attribute opens the Texture Manager dialog. To load an image map, either select the path from the drop-down list or click the Browse button to open a standard Open dialog and select the image you wish to load. A preview of your selected image should appear in the preview window. You can also select to use a global gamma value as set in the Render Settings dialog, or enter a specific gamma value that is unique to the selected texture. Click OK to implement your changes or Cancel to abort.
When creating PBR-type shaders, Diffuse textures typically use the gamma value from Render Settings. All other image types (bump, height, specular, transparency, normal, metal, and roughness) use a Custom Gamma value of 1. Poser tries to automatically assign a custom gamma value of 1 to images when they are dragged and dropped into the material room, based on a recognized suffix in the filename. For example, if the filename ends in _normal or _n, it will detect that it is a normal map and automatically assign a gamma value of 1.
This function recognizes the following words in the filenames, preceded by an underscore character:
_albedo or _a
_bump or _b
_color, _col, or _c
_diffuse or _d
_emissive or _e
_height or _h
_normal or _n
_roughness, _rough, or _r
_specular, _spec, or _s
_transparency, _trans, or _t
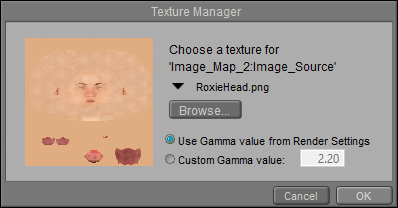
Choosing a texture map.
- Auto_Fit: Check this option to automatically fit the texture map to the currently selected material without tiling.
- U Scale: The U_Scale attribute sets the U scale factor to apply to the texture map when using UV or VU mapping. When using a projection map method (see below), this is one of two attributes used to define the world space size of the texture map being projected onto the surface.
- V Scale: The V_Scale attribute sets the V scale factor to apply to the texture map when using UV or VU mapping. When using a projection map method (see below), this is one of two attributes used to define the world space size of the texture map being projected onto the surface.
- U Offset: The U_Offset attribute defines the U position of the first texture tile in UV space. When using a projection map method (see below), this is one of two attributes used to define the position of the upper left corner of the projection “screen” in grid units.
- V Offset: The V_Offset attribute defines the V position of the first texture tile in UV space. When using a projection map method (see below), this is one of two attributes used to define the position of the upper left corner of the projection “screen” in grid units.
- Texture Coordinates: The Texture_Coordinates pull-down menu offers the following choices:
- UV: The UV option behaves like rubber wallpaper that can stretch over the object surface; the image file is made to correspond with set positions on the object’s surface, making any distortion caused by the stretching seem more natural. This is the most versatile mapping method.
- VU: The VU option is identical to UV mapping, except that the image map is rotated 90 degrees.
- XY: The XY option works like a slide projector in that the “screen” being projected onto is the XY plane whose size and position are determined using the U_Scale, V_Scale, U_Offset, and V_Offset parameters. Any surface not oriented with the selected viewing plane will distort the texture at render time.
- XZ: Same as above but uses the XZ plane.
- ZY: Same as above but uses the ZY plane.
- Image Mapped: The Image_Mapped pull-down menu offers the following choices:
- None: The background color will be used for all areas of the object not covered by the texture map.
- Alpha: The background color will be used for all areas of the object not covered by the texture map. The background color will also be blended with the texture map based on the alpha channel of the texture map.
- Clamped: The edge pixels of the texture map are repeated to cover any area of the object that the texture map does not cover.
- Tile: The texture map will be tiled to ensure total coverage. Tiling is controlled using the Mirror U and Mirror V attributes, below.
- Background: The Background attribute specifies the background color. Clicking this attribute opens a standard Color Picker. Global_Coordinates button forces projected maps to use global instead of local coordinates.
- Global Coordinates: This option is unused.
- Mirror U: Enabling the Mirror_U option can help hide the seams between texture cells when tiling textures.
- Mirror V: Enabling the Mirror_V option can help hide the seams between texture cells when tiling textures.
- Texture Strength: The Texture_Strength attribute defines the strength of the texture map, where 1=100%.
- Filtering: The Filtering attribute allows you to select one of three options for texture filtering on the selected image map. These options are: None--no texture filtering; Fast--high-speed texture filtering; Quality--high-quality texture filtering; Crisp--provides more aliasing for increased crispness.
The Texture Filtering option defaults to the Crisp option.
If you view seams in your textures during preview or rendering, the cause is usually that the textures don't extend very far past the template boundary line. While it has been suggested that changing from Crisp to Quality filtering can help this situation, it is not really an optimal solution, especially when you intend to use the texture maps in other 3D applications in addition to Poser. Instead, content creators are recommended to create "bleed areas" in the texture maps that extend beyond the template boundary.
Usually a bleed of about 10-12 pixels for a 2K texture, and 20-25 pixels for a 4K texture will be sufficient enough to prevent visible seams at UV boundaries in most applications. An example of a bleed for a 4K head texture is shown in the following figure. The blue grid is the UV template for the head, and the actual head texture extends outward by 20 pixels in this example. Popular texturing programs such as Substance Painter and ZBrush allow you to configure the amount of bleed in their export settings.
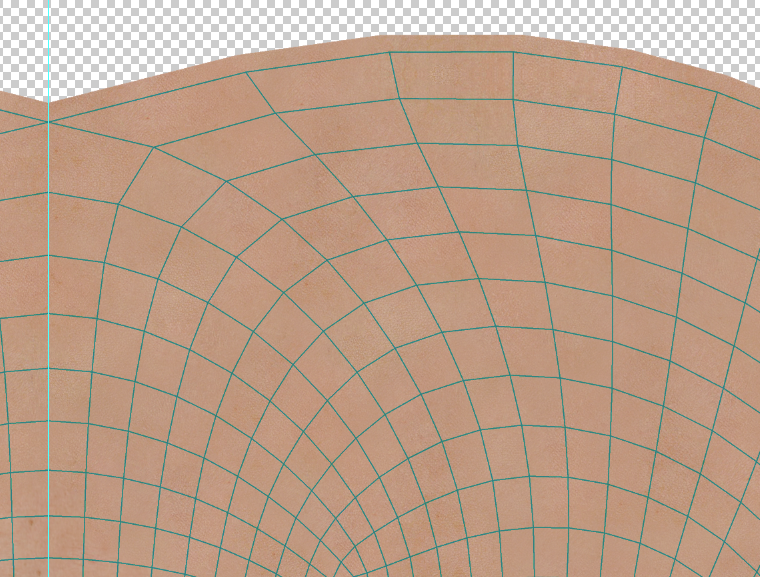
Extend textures out beyond the template area to prevent seams from showing during previews and renders.
Movie
The Movie node allows you to add animations to materials. Supported formats are AVI, MPG, and WMV. This node has the following attributes:
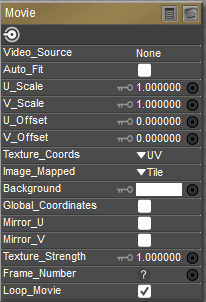
Movie node.
- Video Source: The Video_Source attribute specifies the path containing the selected animation.
- U_Scale: The U_Scale attribute defines the size of the animation in the U direction.
- V_Scale: The V_Scale attribute defines the size of the animation in the V direction.
- U Offset: The U_Offset attribute defines the U position of the first texture tile in UV space. When using a projection map method (see below), this is one of two attributes used to define the position of the upper left corner of the projection “screen” in grid units.
- V Offset: The V_Offset attribute defines the V position of the first texture tile in UV space. When using a projection map method (see below), this is one of two attributes used to define the position of the upper left corner of the projection “screen” in grid units.
- Texture Coordinates: The Texture_Coordinates pull-down menu offers the following choices:
- UV: The UV option behaves like rubber wallpaper that can stretch over the object surface; the PICT file is made to correspond with set positions on the object’s surface, making any distortion caused by the stretching seem more natural. This is the most versatile mapping method.
- VU: The VU option is identical to UV mapping, except that the image map is rotated 90 degrees.
- XY: The XY option works like a slide projector in that the “screen” being projected onto is the XY plane whose size and position are determined using the U_Scale, V_Scale, U_Offset, and V_Offset parameters. Any surface not oriented with the selected viewing plane will distort the texture at render time.
- XZ: Same as above but uses the XZ plane.
- ZY: Same as above but uses the ZY plane.
- Image Mapped: The Image_Mapped pull-down menu offers the following choices:
- None: The background color will be used for all areas of the object not covered by the texture map.
- Alpha: The background color will be used for all areas of the object not covered by the texture map. The background color will also be blended with the texture map based on the alpha channel of the texture map.
- Clamped: The edge pixels of the texture map are repeated to cover any area of the object not which the texture map does not cover.
- Tile: The texture map will be tiled to ensure total coverage. Tiling is controlled using the Mirror U and Mirror V attributes, below.
- Background: The Background attribute specifies the background color.
- Global Coordinates: Checking the Global_Coordinates button forces projected maps to use global instead of local coordinates.
- Mirror U: Enabling the Mirror_U option can help hide the seams between texture cells when tiling textures.
- Mirror V: Enabling the Mirror_V option can help hide the seams between texture cells when tiling textures.
- Texture Strength: The Texture_Strength attribute defines the strength of the animated texture map, where 1=100%.
- Frame Number: The Frame Number attribute functions primarily as an input for other nodes (such as math and variable nodes), and allows you to retime the animation controlled by this node.
- Loop Movie: Checking the Loop Movie checkbox loops the animation.
Tile
The Tile node is a 2D texture that simulates tile patterns. It has the following attributes:
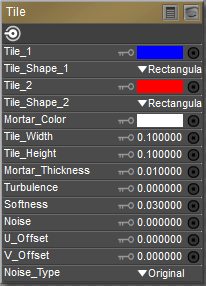
Tile node.
- Tile 1: The Tile_1 attribute defines the first tile color. Clicking it opens the standard Color Picker.
- Tile Shape 1: The Tile_Shape_1 pull-down menu defines the shape of the first tile. Your options are:
- Rectangle: Selecting Rectangular will make the tiles rectangular.
- Ellipsoid: Selecting Ellipsoid will make the tiles elliptical.
- Tile 2: This attribute defines the second tile color. Clicking it opens the standard Color Picker.
- Tile Shape 2: The Tile_Shape_2 pull-down menu defines the shape of the second tile. This menu has the same options as the Tile 1 Shape menu, described above.
- Mortar Color: The Mortar_Color attribute defines the mortar color. Clicking it opens the standard Color Picker.
- Tile Width: The Tile_Width attribute defines the tile’s width.
- Tile Height: The Tile_Height attribute defines the tile’s height in.
- Mortar Thickness: The Mortar_Thickness attribute determines the spacing between bricks.
- Turbulence: Defines the low-frequency randomness of the brick pattern.
- Softness: The Softness attribute defines how softly the brick blends into the mortar.
- Noise: The Noise attribute defines the high-frequency randomness of the brick pattern.
- U Offset: The U_Offset attribute defines the U position of the first texture tile in UV space. When using a projection map method (see below), this is one of two attributes used to define the position of the upper left corner of the projection “screen” in grid units.
- V Offset: The V_Offset attribute defines the V position of the first texture tile in UV space. When using a projection map method (see below), this is one of two attributes used to define the position of the upper left corner of the projection “screen” in grid units.
- Noise_Type: The Noise_Type attribute allows you to select between the Original Perlin type and the Improved enhanced noise definitions.
Wave2D
The Wave2D node implements a two-dimensional sin / cos trigonometric function, resulting in a two-dimensional wave effect.
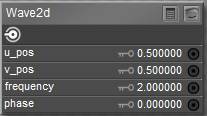
Wave 2D node.
- u_pos: Adjusts the horizontal position of the wave.
- v_pos: Adjusts the vertical position of the wave.
- frequency: Higher settings create more concentric circles in the texture.
- phase: Adjusts the light-dark positions in the rings of the concentric circles.
Weave
The Weave node creates woven textile effects. It has the following attributes:
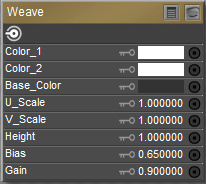
Weave node.
- Color 1: The Color_1 attribute defines the first woven color. Clicking this attribute opens the standard Color Picker.
- Color 2: The Color_2 attribute defines the second woven color. Clicking this attribute opens the standard Color Picker.
- Base Color: The Base_Color attribute defines the underlying color behind the woven pattern. Clicking this attribute opens the standard Color Picker.
- U Scale: The U_Scale attribute defines the size of the weave in the U direction.
- V Scale: The V_Scale attribute defines the size of the weave in the V direction.
- Height: The Height attribute defines the height of the woven pattern.
- Bias: The Bias attribute adjusts the weave’s bias.
- Gain: The Gain attribute adjusts the weave’s gain.