Kitty3 Metal, Emission and Opacity-Physical
The materials used in the Kitty3 textures have the most auxiliary maps to connect, but the process will be fairly straightforward. This page will show you how to connect Metallic, Emission, and Opacity maps to the Physical Surface node.
| Metallic Map | Emission Map | Opacity Map |
 |
 |
 |
|
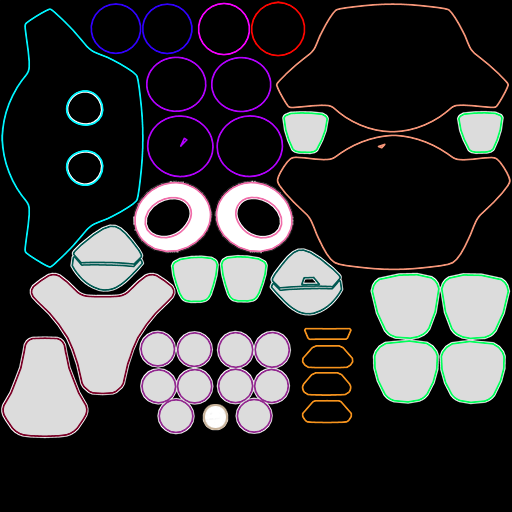
Materials Using Metallic map: (White areas are metallic, black areas are non-metallic)
|
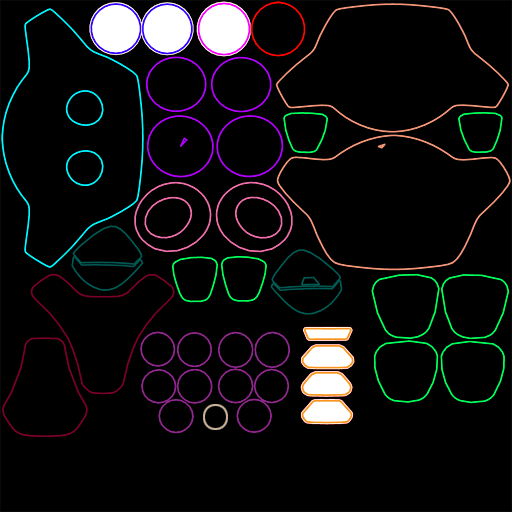
Materials Using Emissive map: (White areas are emissive, black areas are not emissive)
|
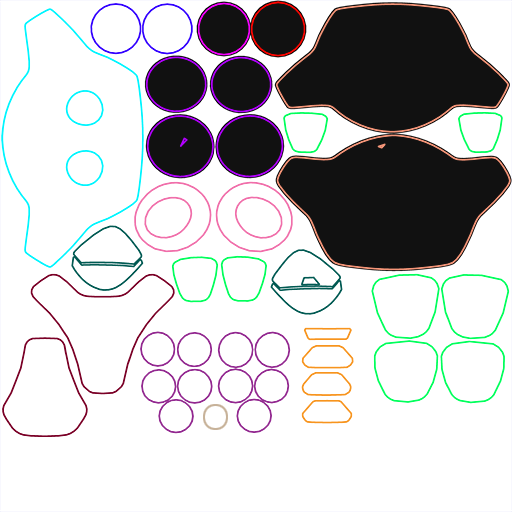
Materials Using Opacity map: (White areas are opaque, black areas are completely transparent)
|
Metallic Maps
There are six materials that use the Kitty3 set of textures that have metallic surfaces. You created these shaders in Kitty3 Base Textures-Physical, which currently have the color, roughness, and normal maps assigned to them. To add the metallic map, proceed as follows.
- Choose the Bolts material, which uses the Kitty3 bases.
- Right-click in an empty space in the edit window and choose New Node > 2D Textures > image_map to add a new image map node.
- Double-click the image map node header, and change the name to Metallic.
- Click the Image Source field to open the Texture Manager. Browse to the Poser 13 Content > Included > Runtime > textures > SAKitty Tutorial folder and choose SAKitty3_Metallic for the metallic texture map.
- When you return to the Texture Manager, assign a Custom Gamma value of 1 to the texture. Choose OK to exit the texture manager.
- Connect the output of the metallic image map node to the Metallic input of the Physical Surface node, and set the Metallic value to 1.
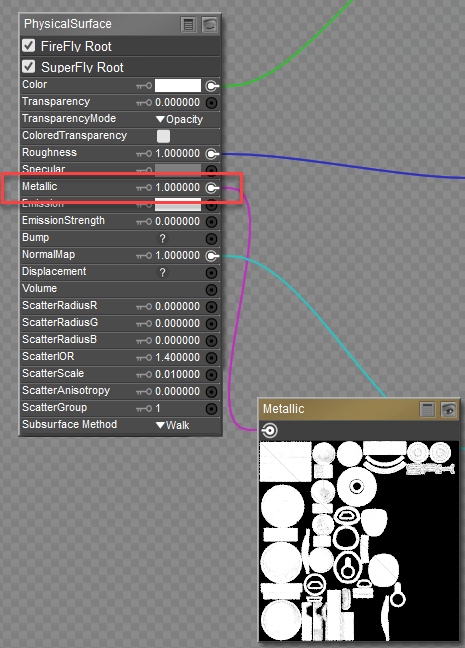
Connecting a Metallic map to Physical Surface Node
Now you will need to copy the Logo material over to the other five surfaces that use the metallic map:
- Right-click an empty space, and choose Select All and then right click again and choose Copy to copy the nodes to your clipboard.
- One at a time, select the following materials from the Materials list. Right-click and choose Select All to select the existing nodes, then right-click again and choose Replace to update them with the nodes in your clipboard:
- DetalColor1: Solar Panel Blue
- DetalColor2: Solar Panel Violet
- DetalColor3: Solar Panel Light Purple
- DetalColor4: Solar Panel Medium Purple
- Eye Frame: Polished Chrome
- Continue to Emission maps, next.
Emission Maps
There are three materials that use the Kitty3set of textures that have emissive surfaces. To add the emissive map, proceed as follows.
- Choose the Eye Glow material, which uses the Kitty3 bases.
- Right-click in an empty space in the edit window and choose New Node > 2D Textures > image_map to add a new image map node.
- Double-click the image map node header, and change the name to Emissive.
- Click the Image Source field to open the Texture Manager. Browse to the Poser 13 Content > Included > Runtime > textures > SAKitty Tutorial folder and choose SAKitty3_Emissive for the texture map.
- When you return to the Texture Manager, assign a Custom Gamma value of 1 to the texture. Choose OK to exit the texture manager.
- Connect the output of the emissive image map node to the EmissionStrength input of the Physical Surface node. The Emissive value defaults to a setting of 1, but you can make the emission dimmer by lowering the value, and brighter by raising the value.
- For emission color, do one of the following:
- Plug the Color map into the Emission connection in the Physical Surface node as shown below, or
- Click the Emission color chip in the Physical Surface node to choose the desired emission color from a color picker.
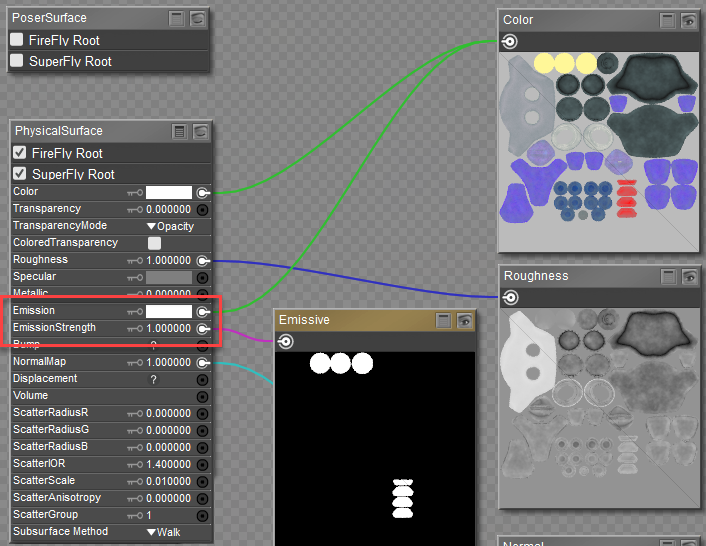
Connecting a Metallic map to Physical Surface Node
- Since we are trying to create a material that can render in both FireFly and SuperFly, you'll notice that if you switch to the FireFly renderer, the Emission areas in the eyes and the LED's don't "light up." What we can do for these Emissive materials is connect them to the PoserSurface node instead (which you'll notice we've left alone up until this point, but it's sitting up there in the corner in the screen shots). If you've deleted them, it's easy enough to just add one back in with the New Node > Root >PoserSurface command.
- Expand the PoserSurface node, and check the option at the top to use it during FireFly renders. Then:
- Either plug the Color map into the Ambient Color input on the PoserSurface node and set the Ambient Color chip to white, or
- Set the desired emissiion color with the Ambient Color chip.
- Plug the Emissive map into the Ambient Value input of the Poser Surface node. Set the Ambient Value to a value that gives the desired emissive glow.
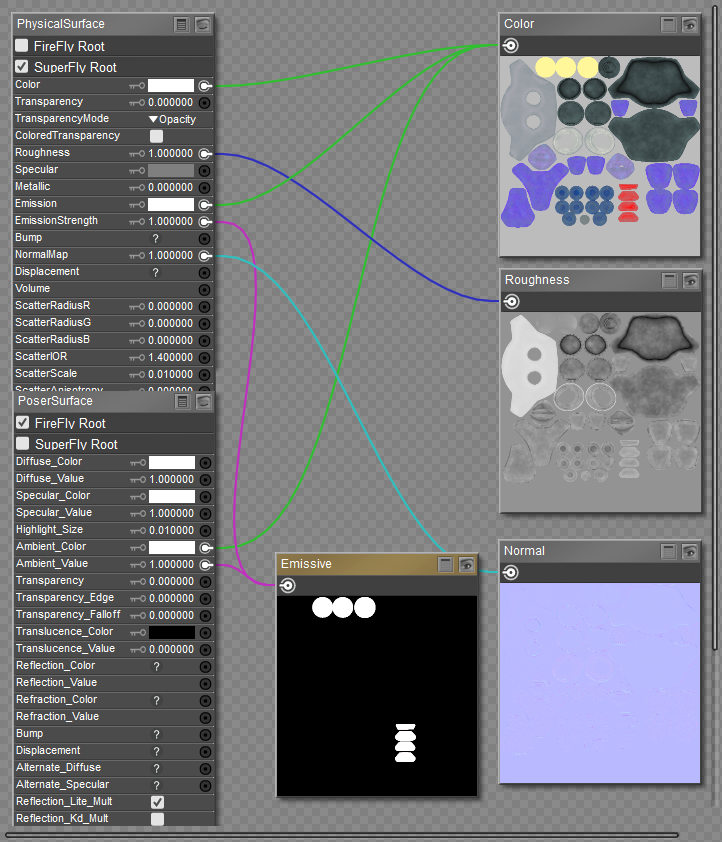
Connecting Emissive to Physical Surface and PoserSurface Nodes
Now you will need to copy the Eye Glow material over to the other two surfaces that use the emissive map:
- Right-click an empty space, and choose Select All , and then choose Copy to copy the nodes to your clipboard.
- One at a time, select the following materials from the Materials list. Right-click and choose Select All to select the existing nodes, then right-click again and choose Replace to update them with the nodes in your clipboard:
- EyeInner: Yellow Emissive
- LED: Red Emissive
- Continue to finish up the Kitty with its Opacity maps, which follow.
Opacity Maps
There are three materials that use the Kitty3 set of textures that use Opacity maps. These materials are glass and used in the Eye Glass, Eye Shield, and Face Shield materials. To add the opaciity map, proceed as follows.
- Choose the Eye Glass material, which uses the Kitty3 bases.
- Right-click in an empty space in the edit window and choose New Node > 2D Textures > image_map to add a new image map node.
- Double-click the image map node header, and change the name to Opacity.
- Click the Image Source field to open the Texture Manager. Browse to the Poser 13 Content > Included > Runtime > textures > SAKitty Tutorial folder and choose SAKitty3_Opacity for the metallic texture map.
- When you return to the Texture Manager, assign a Custom Gamma value of 1 to the texture. Choose OK to exit the texture manager.
- Connect the output of the opacity image map node to the Transparency input of the Physical Surface node.
- Set the Transparency Mode to Opacity (should be selected by default).
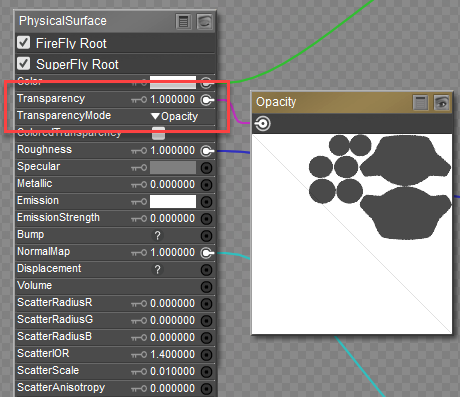
Connecting a Metallic map to Physical Surface Node
Now you will need to copy the Logo material over to the other two surfaces that use the metallic map:
- Right-click an empty space, and choose Select All and then right click again and choose Copy to copy the nodes to your clipboard.
- One at a time, select the following materials from the Materials list. Right-click and choose Select All to select the existing nodes, then right-click again and choose Replace to update them with the nodes in your clipboard:
- Eye Shield: Gray glass
- Face Shield: Gray glass
That's it! You're done with a complex multi-sub object material that uses PBR textures and which renders in both FireFly and SuperFly in Poser 11 through Poser 13. Don't forget to save your new material to the Library. An example of this material has been saved in the Included > Runtime > Libraries > Materials > Toys > SAKitty Tutorial folder as SAKitty-Physical.mc6.