Layers Tab
Contents
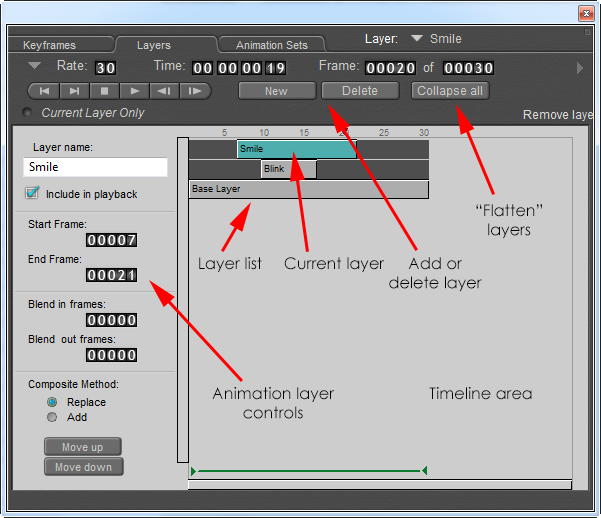
Animation layers, also known as non-linear animation, provide you with the ability to separate different parts of an animation into independent pieces, which can be individually edited, moved, or even hidden, with respect to the entire animation. At render time, the various layers are composited together into a single animation, according to your specifications. The Layers tab on the Animation palette contains the controls that allow you to create, configure, move and delete animation layers.

Layers tab in the Animation Palette.
If you switch from the Layers tab to the Keyframes, you will see any keyframes that exist in the currently selected animation layer. If you wish to see keyframes from another layer, use the Current Layer pop-up menu at the top of the Animation palette to select any existing layers, without having to return to the Layers tab.
Base Layer
When you first begin to create an animation, only one layer will exist; this is known as the Base layer. The Base layer is always present, and if you wish, you can create your entire animation just in this single layer. The frame count of the Base layer is equivalent to the length of the entire animation. The Start frame of the Base layer is always Frame 1, and the End frame is the last frame in the entire animation. Thus, changing the End frame of the Base layer changes the length of your animation, which will affect any other layers whose End frames coincide with the End frame of the Base layer.
You cannot change any properties of a Base Layer other than the End frame.
Creating, Deleting & Previewing Animation Layers
In addition to the shared controls common to all three tabs on the Animation palette (see Using the Animation Palette for a description of these controls), the upper section of the Layers tab also contains three buttons:
- New: Click the New button to create a new animation layer.
- Delete: Click the Delete button to delete the currently selected animation layer. This feature is disabled when the Base layer is selected.
- Collapse Layers: Click the Collapse Layers button to combine all layers with the base layer/
- Current Layer Only: Click the Current Layer Only radio button to temporarily exclude all other animation layers from the playback. Doing so allows you to isolate the specific animation contained within the current layer, which can be helpful in scenes with multiple layers.

Current Layer Only option.
Animation Layer Controls
The lower portion of the Layers tab contains additional controls that allow you to configure a selected layer, and the Timeline Area, which displays the various layers in editable segments, allowing you to see the hierarchy of the layers as well as where each layer is placed in the timeline of the entire animation. The Layer controls are as follows:

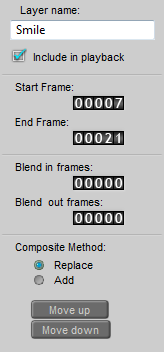
Layer Controls.
- Layer Name: Once you have created a new layer, you can change its default name to anything you want. Simply select the layer in the Timeline display, and type the new name in the text field.
- Include in Playback: Check or uncheck this option to include or exclude the selected clip when you preview your animation.
- Start/End Frame: The Start frame and End frame controls allow you to specify the Start and End frames for the selected layer. While the Base layer always equals the length of the entire animation, other layers can be of any length up to the entire animation length, and can start and end at any point within the duration of the animation. You can change the Start and End frames by clicking on the frame number and typing a new value into the field. Alternately, you can click on the layer segment in the Timeline Area and drag it to a new position; the segment length will remain constant, but the Start and End frames will change. Clicking and dragging on either the beginning or the end of the layer segment will change the Start or End frame respectively, without moving the position of the segment within the animation timeline. The length of the layer segment will adjust to accommodate the new Start or End frame number.
- Blend In/Out Frames: The Blend In/Out feature allows you to gradually blend an animation layer into, or out of, the full animation. This feature could be used, for example, to create the effect of wind gradually picking up or fading away. The Blend in frames and Blend out frames settings allow to you specify over how many frames the linear blend will occur. The Blend In/Out frame count is indicated on the layer segment display as an additional shaded segment attached to either the beginning or end of the layer segment.
If the animation contained within a specific layer is a gradual movement, then the Blend feature may not be effective, particularly if the Blend In/Out frame counts are set too low.
- Composite Method: While compositing the full animation, Poser begins with the Base layer, and works upwards through the layer hierarchy incorporating each layer one by one. The Composite method setting allows you to specify the manner in which the individual layers will be composited. The two options for compositing animation layers are Replace and Add.
- Replace: This is the default composite method for animation layers. Selecting Replace means that any action on a given parameter for a specific actor will replace any actions on the same parameter, on all layers below the selected layer. For example, let’s suppose that Layer1 is below Layer2 in the animation layer hierarchy. Let’s also suppose that in Layer1 James’ chest is twisted twenty degrees to the left, but in Layer2 his chest is twisted only ten degrees to the left. With the Replace option, the Layer2 setting will replace the setting from Layer1.
- Add: Selecting Add means that the values for all rotation and translation parameters will be added to one another as Poser composites each layer into the animation. Using the above example, the twenty degrees of Twist from Layer1 would be added to the ten degrees from Layer2, resulting in a greater effect of thirty degrees of Twist. However, if Layer1 had included a twist of negative twenty degrees, while Layer2 had included a twist of positive ten degrees, then the Add option would result in a final twist effect of negative ten degrees.
- Move Up/Down: If you select the Replace composite method, the specific order of the layers within the layer hierarchy will be very important, as parameter settings in higher layers replace those in lower layers (see above for additional explanation). You can change the order of layers within the hierarchy by clicking the Move up or Move down button to move the selected layer either up or down one level. Clicking the button a second time will repeat the action.