Camera Parameters
Like all parameter dials, clicking and dragging a dial to the right increases its value, and clicking and dragging to the left decreases its value. You can also click your desired parameter’s numeric value to open a text field allowing you to directly type your desired value.
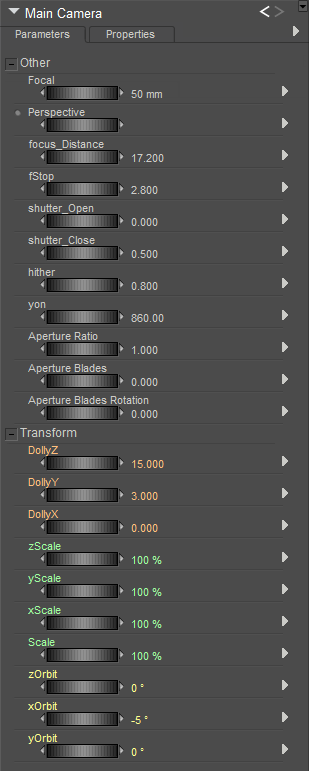
Camera Parameters.
Other Parameters
The Other Parameters section contains a variety of parameters to control the behavior of the selected camera. These parameters are as follows:
- Focal: The Focal parameter dial sets the camera’s focal length. Smaller numbers give wider angles and will add more stretching and distortion as they decrease. Larger numbers give results like telephoto lenses, and result in less distorted but flatter images.
- Perspective: The Perspective parameter shifts the current camera’s perspective without changing the camera’s location. This can give the illusion that the camera is farther or nearer to objects in your scene. The Perspective setting is hidden, because it is interconnected with the Focal setting. If you adjust the Perspective dial, you will see a change in the Focal setting.
- Depth of Field: Widening the lens aperture of the camera allows you to achieve a Depth of Field effect. The farther away items are from the focal plane, the more blurred they will appear. Depth of Field can be individually configured for each camera. Poser allows you to enable or disable Depth of Field for individual renders. In order for depth of field to render, you must enable the Depth of Field option in the Render Settings dialog. Please refer to Using The FireFly Render Engine for details on how to do this using the FireFly Renderer. The following images illustrate the Depth of Field effect.
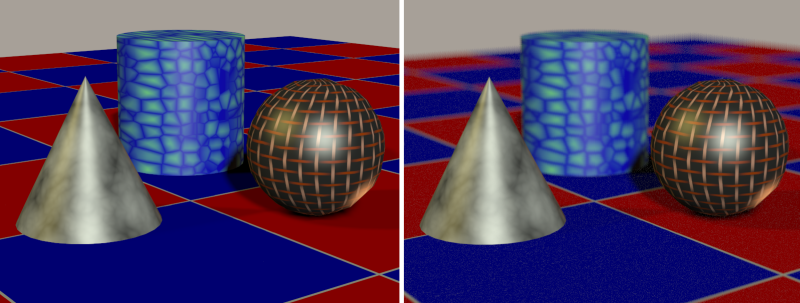
Without depth of field (left); With depth of field (right).
If the results of your Depth of Field settings are too grainy in the blurred areas, try raising the number of Pixel Samples. Doing so will result in a smoother effect, but increased render times.
- Focus Distance: The focus distance dial controls the cross hair so that you can position the focus. Place the cross hair at the distance at which objects appear most in focus. In Poser, focal distance for each camera is determined by a control object located within the scene. You can animate the control object like any other figure in Poser, by using keyframes to specify its change in position; Poser will interpolate the movement between keyframes for you. (For more information about animating using keyframes, please refer to Animating with Poser.) Enter your desired value in the camera’s Focus Distance field.
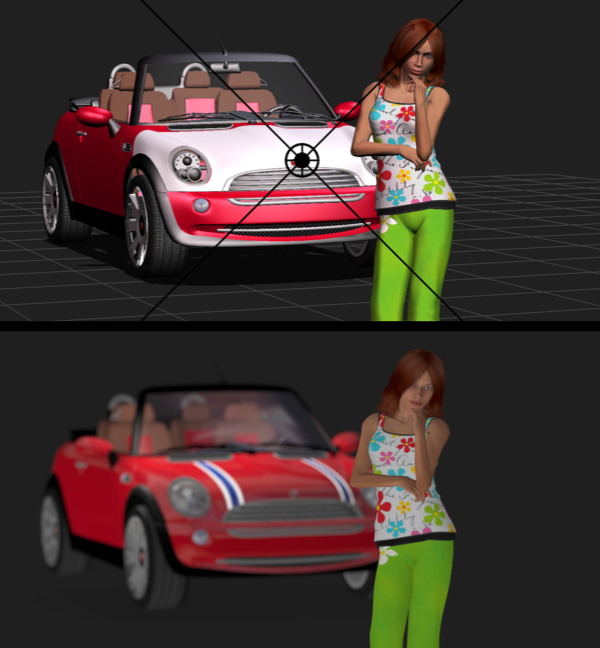
The Focus Distance control, with Alyson as the point of focus, and its render.
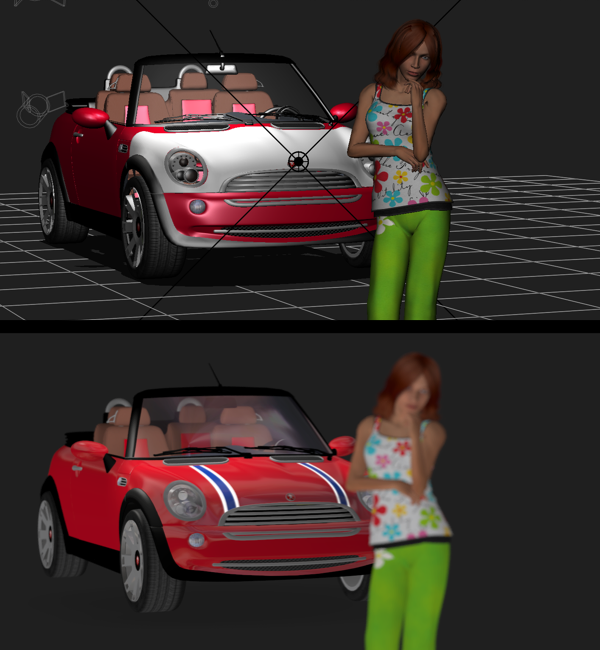
The Focus Distance control, with the car as the point of focus, and its render.
- F-Stop: The F-Stop number represents a lens aperture size. The larger the number, the smaller the aperture opening. Each number is multiplied by a factor of approximately 1.4 as the scale rises, giving standard values of 1.0, 1.4, 2, 2.8, 4, 5.6, 8, 11, 16, 22, 32, etc. Each change either doubles or halves the amount of light transmitted by the lens to the film plane. Basically, f-stop is calculated from the focal length of the camera lens divided by the diameter of the bundle of light rays entering the lens and passing through the aperture in the iris diaphragm. On a physical camera, this represents the lens focal length (see next bullet) divided by the f-stop value to determine the actual aperture size. The F-Stop setting affects the depth of field in Poser, just as it would in a real camera lens. Smaller F-stops increase depth of field and narrow the point of focus. Focus on the subject, and then enter the desired value in the F-Stop field.
- Pitch: The Pitch parameter rotates the selected camera about its own X axis (up/down). A positive number pitches the camera up (the scene appears to pitch down), and vice versa.
- Roll: the Roll parameter rotates the selected camera about its own Z axis (tip left/tip right). A positive number rolls the camera to the left (the scene appears to rotate to the right), and vice versa.
- Yaw: The Yaw parameter rotates the selected camera about its own Y axis (rotate left/rotate right). A positive number yaws the camera to the left (scene appears to yaw to the right), and vice versa.
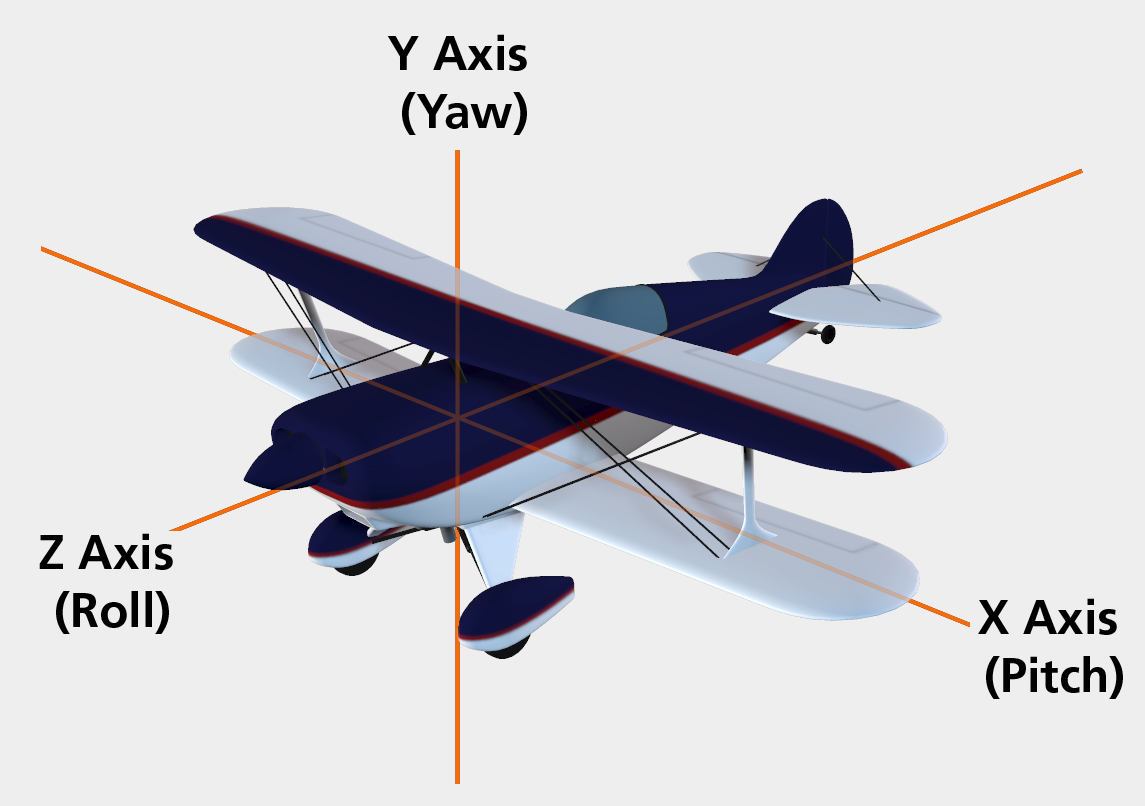
Pitch (Up or Down); Roll (Tilt); Yaw (Turn).
- Shutter Open: The Shutter Open value represents the shutter opening time in fractions of a frame, where 0.0 is the beginning of the frame and 1.0 is the end of the frame. Unlike a real camera shutter, this one opens and closes instantly with zero elapsed time. Regular camera shutters, while extremely fast, require a small time interval to travel between the closed and open positions.
- Shutter Close: The Shutter Close value represents the shutter closing time in fractions of a frame, where 0.0 is the beginning of the frame and 1.0 is the end of the frame. Unlike a real camera shutter, this one opens and closes instantly with zero elapsed time. Regular camera shutters, while extremely fast, require a small time interval to travel between the closed and open positions. For example, setting a beginning time of 0.0 and an ending time of 0.5 means the shutter would be open for the first half of a frame.
See Motion Blur Document for more information on using motion blur in your projects.
- Hither : The Hither parameter controls the distance of the near clipping plane. Objects (or portions thereof) closer to the camera than the hither distance will not appear in your view pane.
- Yon: The Yon parameter sets the farther range of the far clipping plane. Objects (or portions thereof) farther from the camera than the yon distance will not appear in your view. The Yon parameter is only applicable with OpenGL hardware rendering.
Transform Parameters
When a camera is selected, you can use the parameter dials on the Parameters palette to precisely adjust that camera’s position. The Dolly, Posing, Face, and Hand cameras have the standard 3D Pitch, Yaw, and Roll parameters, while the Main and Auxiliary cameras have xOrbit, yOrbit, and zOrbit parameters. These parameters are measured in degrees.
XYZ Dolly
The Dolly parameter dials move the selected camera along the desired axis without altering its orientation, just like a movie camera on a dolly cart, as shown below.
- DollyX: The DollyX parameter moves the camera laterally. Increasing this value moves the camera to the right.
- DollyY: The DollyY parameter moves the camera vertically. Increasing this value moves the camera up.
- DollyZ: the DollyZ parameter moves the camera in and out. Increasing this value moves the camera in.
XYZ Scale
As mentioned above, camera scale functions like a zoom lens. The Scale control zooms the camera equally in all three axes. Using the parameter dials, however, you can scale in any amount using any combination of axes to create distorted effects. While this might give the same appearance as distorting the figures/props in your scene, scaling cameras only affects the selected camera; items in your scene are not affected. Decreasing scale values zooms in along the selected axis, and vice versa.
- xScale: The xScale parameter changes the camera’s horizontal scale.
- yScale: The yScale parameter changes the camera’s vertical scale.
- zScale: The zScale parameter changes the camera’s depth scale.
- Scale: The Scale parameter dial changes the selected camera’s scale equally along all three axes and functions in the same manner as the Scale camera control. If you have already selected unequal scales using the individual axis controls, the Scale dial/control preserves your previously selected ratios.
XYZ Orbit
The Orbit parameters orbit the selected camera around the indicated Poser workspace axis. It helps to think of the selected axis as the center of a wheel with the camera being at the edge. The camera maintains its distance from the axis and remains pointing in the same direction relative to its starting point. Setting positive degrees of rotation in the Orbit parameter dials orbits the selected camera in a counterclockwise direction around the selected axis, and vice versa.
- xOrbit: The xOrbit parameter orbits the selected camera using the Poser workspace’s X axis as the center of rotation.
- yOrbit: The yOrbit parameter orbits the selected camera using the Poser workspace’s Y axis as the center of rotation.
- zOrbit: The zOrbit parameter orbits the selected camera using the Poser workspace’s Z axis as the center of rotation.