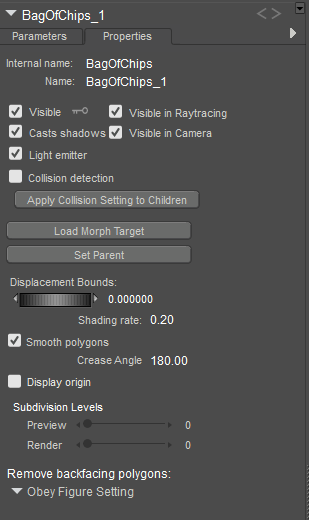
Prop Properties
Props have the following properties:

Prop properties.
- Internal Name: The Internal Name field displays the prop’s internal (hidden) name, which Poser uses to track that part. You cannot edit a prop’s internal name within Poser.
You can animate the prop visibility by clicking the key icon next to the Visibility option. Key will be white when animation is on, and gray when animation is off.
- Name: The Name field displays the prop name. Enter a new name in this field if you desire.
- Visible: Checking the Visible checkbox makes the prop visible and vice versa. Invisible props are not included in any render calculations, and do not appear in the rendered scene. See Figure Properties for information on animating the Visible property.
- Visible in Raytracing: Checking the Visible in Raytracing checkbox makes the prop visible in raytraced reflections, such as if the figure is in front of a mirror. Clearing this checkbox makes the figure not appear in reflections.
- Casts Shadows: Checking the Casts Shadows checkbox forces the selected prop to cast a shadow, which will be visible in your scene. Clearing this box means the selected body part casts no shadow.
- Visible in Camera: When checked, the object is visible in the camera and render. When unchecked, the object does not render. Used in conjunction with Light Emitter, described next, to create light-casting objects.
- Light Emitter: When checked, allows the object to be included in indirect lighting calculations so that light will bounce off the object. When unchecked, indirect lighting calculations are skipped for the object.
- Collision detection: Checking the Collision Detection checkbox enables collision detection for the currently selected prop. Please refer to Collisions for more information about collision detection.
- Apply Collision Setting to Children: Clicking the Apply Collision Setting to Children button applies the currently selected prop’s collision detection setting to that part’s children parts (if any).
- Load Morph Target: Clicking the Load Morph Target button displays the Load Morph Target dialog, allowing you to load a custom morph target for the selected prop (which is then editable using the Morphing Tool). Please refer to Modifying Figures & Props for more information about loading morph targets.
- Set Parent: Clicking the Set Parent button allows you to make the prop a child of another element in your scene. Please refer to Changing a Parent for information on setting prop parents.
- Displacement Bounds: The Displacement Bounds property determines the prop’s displacement boundary. Please refer to Using The FireFly Render Engine for more information about displacement bounds.
- Shading Rate: The Shading Rate allows you to specify the desired shading rate for the currently selected prop. Lowering the shading rate improves your render quality but consumes computer resources. Please refer to Using The FireFly Render Engine for more information about shading rates.
- Smooth Polygons: Checking the Smooth Polygons checkbox causes Poser to smooth the prop’s polygons at render time to eliminate or reduce a “faceted” appearance caused by flat polygons. This option can cause sharp corners to appear round. If the affected prop has sharp angles, you should experiment with disabling this option for optimum results.
- Crease Angle: The Crease Angle setting establishes a threshold up to which creases between adjoining polygons will be smoothed. Polygons with crease angles over this threshold will not be smoothed, and will be rendered as hard edges. See Smoothing Geometry for more information about using the Crease Angle setting to apply smooth shading.
- Display Origin: Checking the Display Origin checkbox displays the prop’s origin. Please refer to The Prop Origin for more information about prop origins.
- Subdivision Levels: Allows you to subdivide the selected prop. See Working with Subdivision Surfaces for more information.
- Remove Backfacing Polygons: Determines how backfacing polygons are displayed on the selected prop:
- Obey Global Setting: Uses the setting that is configured in the Render Settings dialog.
- Force Show Backfacing Polys: Backfacing Polys will always be shown in the currently selected figure.
- Force Hide Backfacing Polys: Backfacing Polys will always be hidden in the currently selected figure.