Camera Controls
The Camera controls allow you to quickly select and position cameras. Used in conjunction with the available Document layouts, they allow you to quickly navigate your scene and/or set up final shots for still or animated output. Remember that every view you see of your scene inside the Document is done using one or more cameras. You can move cameras in any direction, however positioning them can be a time-consuming process. Having multiple cameras allows you to use preset camera positions to quickly navigate your scene, while the ability to position cameras allows you to create custom still or moving shots for use either while working on your scene or during rendering.
The Camera controls allow you to select and move one or more Poser cameras. There are two types of camera controls: View and Position.

The Camera Controls.
To use the Camera controls, simply click and drag your desired control. Moving a camera does not change the locations or poses of figures, props, and other elements in your scene. Please refer to Cameras for complete information about the Camera controls.
- The topmost controls are the View controls. Clicking one of these controls activates the Face, Left Hand, or Right Hand camera, as appropriate. You can also scroll through the list of available cameras.
- The controls beneath the hand controls are used to turn camera animation on or off, or to use the Flyaround camera.
- The Animation On/Off control allows you to enable or disable automatic keyframe generation when you move or change rotation of a camera.
- The Flyaround camera view provides an animated view of your scene as a camera rotates around it while pointed at the center origin.
- The Position controls appear below these controls and are used to move or rotate the currently selected camera. The Camera Plane position controls move the camera along the X, Y, and/or Z axis, while the Trackball rotates the currently selected camera without changing its location in 3D space.
- The Frame Selected button changes the camera view to fit around the currently selected actor. See Frame_Selected.
- The Orbit Selected button rotates the camera around the currently selected actor. See Orbit_Selected.
The Orbit Selected mode does not work with cameras that are already set to orbit a specific body part (such as the Face, Left Hand, and Right Hand cameras).
Camera Mini-Controls
The Mini Camera Controls located at the top right of the Preview tab contain a subset of the total available Camera controls. From left to right, these are:
- Frame Selected Object: Allows you to pick a body part and then frame that body part in the camera view. See Frame_Selected.
- Orbit Selected Mode: The Orbit Selected command rotates the camera around the currently selected actor. See Orbit_Selected.
The Orbit Selected mode does not work with cameras that are already set to orbit a specific body part (such as the Face, Left Hand, and Right Hand cameras).
- Camera Rotation: The Camera Rotation trackball tilts and spins the currently selected camera about all three axes.
- Move XZ: Clicking and dragging the Move XZ control moves the currently selected camera along the X and/or Z axes.
- Move XY: Clicking and dragging the Move XY control moves the currently selected camera along the X and/or Y axes.
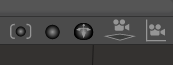
Mini Camera Controls.