Polyline Measurements
The Polyline measurement tool allows you to determine precise opened or closed measurements along a straight or splined path. In particular, the Polyline measurement tool is helpful in determining and adjusting measurements of a body shape. This allows you to accurately reproduce body measurements of a character.
The following example shows how you can obtain an accurate measurement of a character’s waist:
- Load your character into Poser.
- Set Document Display mode to the new Lined Texture Style (the last icon in the Document Display palette). This displays the figure’s wireframe over the texture and helps you more clearly view the flow of the figure’s geometry while you draw the polyline around the waist.
- Choose Object > Create Measurement > Create Polyline, or click the Measurement Mode icon in the bottom right corner of the document window and select Create Measurement - Polyline.
- In the Properties palette, you can set the following options before or after you create your polyline:
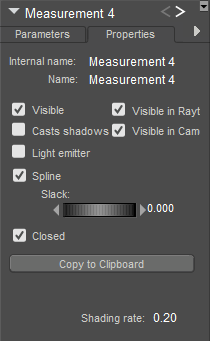
Polyline measurement properties.
- Name: Enter a name that describes the measurement you are creating (for example, WaistMeasure). Note that if you enter a name that already exists for a figure or object in the scene, the name that you enter will be appended by a number.
- Visible: Turns display of the measurement indicator on or off. Keep this option checked to view the angle measurement while you are creating it.
- Vislble in Raytracing: Checking the Visible in Raytracing checkbox makes the measurement object visible in raytraced reflections, such as when the figure is in front of a mirror. Clear this checkbox to make the measurement object not appear in reflections.
- Casts Shadows: Checking the Cast Shadows checkbox forces the selected measurement object to cast a shadow that is visible in your scene. Clear the checkbox to cast no shadow.
- Vislble in Camera: When checked, the measurement object is visible in the camera and in the final render. When unchecked, the object does not render.
- Light Emitter: When checked, allows the object to be included in indirect lighting calculations so that light will bounce off the object. When unchecked, indirect lighting calculations are skipped for the object.
- Spline: Check this option to create smooth curves between your polyline points. Uncheck the option to create straight lines between the polyline points..
- Slack: Adjusts the amount of space between the figure and the segments in the polyline.
- Closed: Check this option to create a closed polyline that automatically connects the current measurement point to the first point that you clicked. Uncheck the option if you want to create an open polyline. (Check this option for this example).
- Copy to Clipboard: Click this button to copy the measurement to the clipboard. This is basically the same information that is displayed in the tooltip in the lower portion of the screen.
- Click to set the starting point, and then draw your polyline around the figure. The measurement points will snap to the figure, and if the Closed option is checked the current point will connect to the starting point as you work your way around the figure. As you draw your polyline you will notice a tooltip in the lower section of the document window that displays the measurement of each segment, along with the total measurement of the polyline.
- After you set the last point, turn off the Edit Measurement mode, using one of the following methods:
- Select another figure or object from the Current Figure/Current Actor menu on the document window.
- Click the Measurement tool in the lower-right corner of the document window and choose Measurement Mode - Display.
- The total polyline length will be displayed in the lower left portion of the document window. If you change the shape of the figure by dialing in a morph or changing the scale of the waist, the measurement will update automatically to reflect the change,
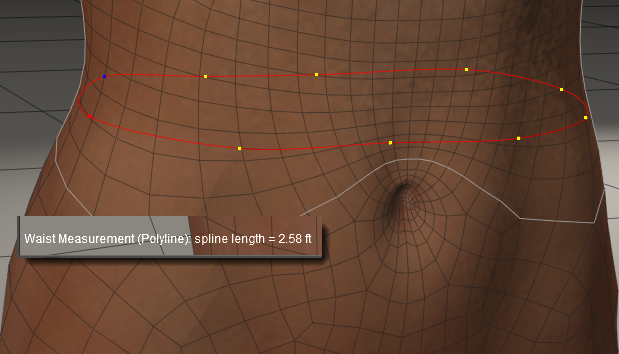
Measurement of polyline.