Creating Joint-Controlled Morphs with GoZ
Joint controlled morphs, in the past, have been difficult to create for Poser, because all morphs had to be loaded when a figure was in its default T-Pose. Eventually, third party Python scripts allowed you to load a “reverse deformation” morph that would track the difference between a posed object, and a “corrected” version of that posed object.
Basically, “reverse deformation” allows you to export a figure in a posed position. Then you can morph out any distortion in the body or piece of clothing, and when you reload that morph back into Poser it only keeps track of the differences between the posed version and the corrected version. This allows you to create morphs that improve the appearance of a joint when it is rotated, and is useful for use in legacy figures that do not utilize weight mapping for improved joint bending.
To create a Joint Controlled Morph (JCM) use the following steps:
- Load the figure that you want to morph into your Poser scene, and select it as the current figure.
- Pose the figure in the pose that you want to correct. For example, if you want to fix an underarm bulge that appears when an arm is raised, then pose the arm in the raised position.
- Do one of the following:
- If your joint controlled morph will span more than one body part, choose Figure > Export Figure Mesh to GoZ.
- If your joint controlled morph will affect only one body part, choose Object > Export Object Mesh to GoZ. A dialog displays some options for the export.

GoZ options dialog.
- To export the model in its posed state, do one of the following:
- Check the Export Posed option if exporting a Poser Traditional mesh or a Poser Unimesh that is not subdivided.
- Check the Bake Results option if exporting a Poser Unimesh that has the Preview subdivision level set to 1 or higher.
- In the Polygon Grouping section, you have two choices for how you can group polygons when you export them to ZBrush. The method that you choose determines how you will be able to show and hide parts within ZBrush (either by material, or by body part) and are primarily for ease of editing in that application. For more information, see Exporting Objects to ZBrush.
- Click Yes to continue. Your body part will open in ZBrush as a subtool. Drag the tool onto the scene and create your morph as you normally do.
- Use the tools in ZBrush to create a morph that improves the appearance of the rotation; or, to add muscle definition such as a muscle bulge when an arm is bent. After your morph is complete, click the GoZ button in the Tool palette (in the upper right section of your screen by default) to send the OBJ file back to Poser.
- When you return to Poser, a dialog asks if you want to import the modified geometry. If you used the Figure > Export Figure Mesh to GoZ it will ask if you want to create a full body morph. If you used the Object > Export Object Mesh to GoZ it will ask if you want to create a morph for the body part you exported.
- Since you are creating a Joint Controlled Morph, you want to apply the morph after the joint is rotated. Uncheck the Apply new morphs before joint rotation option.
- Enter a name for the new morph and press OK to continue.
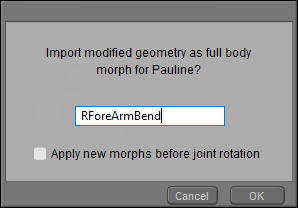
Enter a name for the new joint controlled morph in Poser.
- Initially, the dial will be set to zero. To test the morph, choose the BODY actor, and dial your morph to test it. You’ll also notice that a corresponding dial will only appear in the individual body actors that were affected by the morph.
- Use the Dependent Parameters editor to link the rotation of the arm to the dial setting on the morph. For example, if you created a morph that creates a bulge in the shoulder when the forearm is bent, use the Dependent Parameters Editor to activate the morph when the forearm is bent to the angle that you created the morph at, and when the forearm is in its default position (bent to zero degrees), set your new morph to zero. When you create your dependencies, make sure you dial your morph in the BODY actor, and not in each individual body part.