Using the Queue Manager
The Queue Manager has three sections: The Queue Menu, the Job List and the Selected Job Panel.
Queue Menu
The Queue Menu allows you to configure how jobs are distributed for processing.
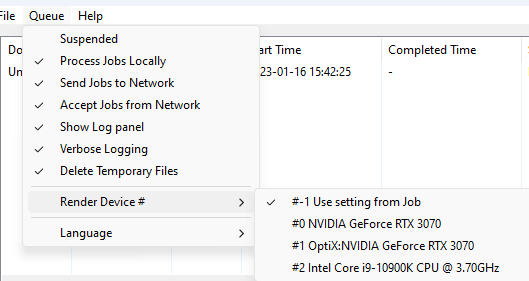
The Render Queue menu.
- Suspended: Selecting Queue > Suspended, suspends the operation of all jobs.
- Process Jobs Locally: Enabling or disabling Queue > Process Jobs Locally, specifies whether or not the Queue Manager will use your local system to render your jobs.
- Send Jobs to Network: Enabling or disabling Queue > Send Jobs to Network, specifies whether or not the Queue Manager will distribute jobs to other systems.
- Accept Jobs from Network: Enabling or disabling Queue > Accept Jobs from Network, specifies whether or not the Queue Manager will process tasks from other systems. Local jobs will always have priority.
- Show Log Panel: Enabling Show Log Panel lets you see a detailed log of the jobs being processed. The Log can be useful for troubleshooting and tracking how other machines are being utilized.
- Verbose Logging: Provides more detailed log events in the Log Panel at the bottom of the Queue Manager window.
- Delete Temporary Files: Check this option to delete temporary files after Queue Manager completes rendering the image(s)
- Render Device: Displays a list of the available graphics adapters on your system. Select the device that you want the Queue Manager to use for rendering. If you choose Use setting from Job, the Queue will use the device that was selected in the Render Settings dialog.
When choosing an OptiX render device in Queue Manager, be sure to disable Branched Path Tracing in Render Settings before selecting the device. Alternatively, set up your OptiX render and other options in the Render Settings dialog and choose "Use Settings from Job" as the Render Device.
- Language: Choose from English, German, or Japanese.
We recommend that you do not perform simultaneous renders on the computer that has Poser installed. Assume, for example, that the Queue Manager has a job list of images or movies that are still in progress. If you want to render another scene that is currently in Poser, send it to the Queue Manager instead of rendering in Poser or sending it to render in background.
Job List
The Job List shows a job’s properties including Document, Output File, Start Time, Completed Time, Status, Frame, Start, End, Increment, Host and Order. On the Selected Job Panel sort the jobs by clicking on any of the property headers. This will not change the job order.

The Render Queue Job List.
- Document: The name of the document in Poser.
- Output File: The job name when submitted to the Queue.
- Progress: Percentage of job completed.
- Start Time: The time the job was received by the Queue Manager.
- Completed Time: The time the job was completed.
- Status:
- Running: The job is currently being processed.
- Waiting: The job is waiting to be processed.
- Suspended: The job is on hold.
- Done: The job is processed and is shown on the job list for reference.
- Frame: Indicates the frame that is currently being rendered.
- Start: Derived from the movie settings dialog.
- End: Derived from the movie settings dialog
- Increment: Derived from the movie settings dialog)
- Host: Indicates the node this job came from.
- Order: Displays the order in which jobs will be rendered.
- Render Device: Displays the device used for the render. "Use Job" uses the device as selected in Render Settings.
Selected Job Panel
Select a job to access the following options.
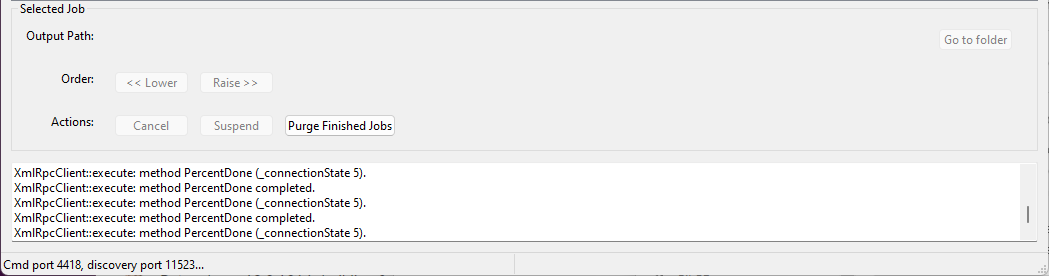
The Selected Job panel, showing verbose logging.
- Output Path: Displays the output location of a selected job.
- Go To Folder: Find the output location of your job anytime by highlighting the job and clicking on the Go To Folder. This will bring you to the output location.
- Order: Once a job is sent to the Queue Manager the job will appear on the job list. You can change the order of the jobs by selecting <<Lower or Raise > > .
- Actions: Select a job from the Job List to change its status using the following actions:
- Cancel: Click Cancel to abort a job (Running, Waiting or Suspended).
- Suspend: Click Suspend to put a running or waiting job on hold.
- Purge Finished Jobs: Click to remove finished jobs from the Queue list.
If you are experiencing difficulty with the Network Render Queue, verify the following:
- All network cables are plugged in and the network is functioning properly.
- Remote systems in the Network Render Queue are up and the Queue Manager application is installed and running.
- Your personal firewall is allowing communication between Poser and the Queue Manager, locally and remotely.
- If you are unable to resolve a network communication issue, contact your Network Administrator.