Loading Full Body Morphs
You can use a third-party application to create a full body morph for a Poser figure, and then use the Figure > Load Full Body Morph command to apply the complete morph to your figure. The Load Full Body Morph command will then split the morphs across each individual body part and create a parameter dial in the Body actor to control all of the individual body part morphs.
In order for the Load Full Body Morph command to work properly, the OBJ file must be grouped the same as the original figure. If the morphed figure does not contain groups, you will only see a parameter dial in the Body actor, and you will not see any change occur when you adjust the dial.
To create a full body morph in a third-party application, import the unmodified OBJ file (usually found in the Geometries folder) into your modeling application. When you use the original OBJ you are assured that your OBJ file is not translated or modified in any way before you create your morph.
When creating your morph in your third-party application, make sure that you do not add or remove vertices or otherwise change the geometry in any way. You can only modify the shape of the original figure. When you export your geometry from your modeling application, you must also make sure that the grouping information is maintained.
Loading a Single Full Body Morph
To load the modified body shape into Poser, follow these steps:
- Load the original figure from the library into your scene, and select it to make it active.
- Choose Figure > Load Full Body Morph. The Load Morph Target dialog appears.
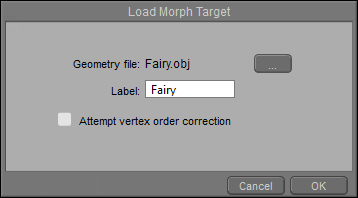
Loading a Morph Target.
- Click the button to the right of the Geometry file section to locate the morphed OBJ file that you exported from your modeling application.
- Enter a name for your morph in the Label field. This is the name that will be assigned to the parameter dials in the Body and individual body actors in the Parameters window.
- Choose OK to complete the process. You should see morph dials in the body and under each individual body part.
Loading Multiple Full Body Morphs
Before you load multiple body morphs, make sure that the OBJ files are named exactly as you want the parameter dial to be named. The same precautions mentioned above should be followed ... that is, all OBJ files should also contain the same groups as the original figure, and that the vertex count and winding order are the same as the original OBJ.
To load multiple full body morphs, follow these steps:
- Load the original figure from the library into your scene, and select it to make it active.
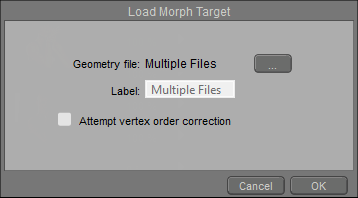
- Choose Figure > Load Full Body Morph. The Load Morph Target dialog appears.
- Click the button to the right of the Geometry file section to locate the folder that contains the objects you want to import. Select the morphs you want to import.
- The Label field in the Load Morph Target dialog will display Multiple Files. You will not be prompted to enter names for each parameter dial. Instead, the OBJ names will be used in the parameters palette. Choose OK to complete the process. You should see morph dials in the body and under each individual body part.
Loading Multiple Morph Targets.
Testing Morphs
- Test the morph(s) by adjusting the dial in the Body section of the Parameters palette.
- If the morph does not work, it may mean that the OBJ you imported did not contain groups. Check to see if a dial appears in any of the individual body parts. If they are absent, your OBJ file did not contain groups. Consult the documentation for your modeling program to determine how to export the groups with your OBJ file.
- If the morph works but it makes the figure “explode”, repeat the process. This time, check the Attempt Vertex Order Correction option in the Load Morph Target dialog. This might resolve the problem.