The Combine Tab
The Combine tab on the Morph Editor allows you to visually sculpt your figures’ morph targets by clicking on a body part such as the head, then dragging the mouse to change the shape of that body part. The changes that you see are all based on the morphs that are already present in the body part. You can do this with any scene object that has morph targets.
The Combine tab has the following functions:

Elements found in the Morphing Tool Combine tab.
- Morphing: Clicking the Morphing button re-enables the Morphing Tool. Click this button after pinning vertices to resume adjusting morphs.
- Pin: Clicking the Pin button disables the Morphing Tool and allows you to pin one or more vertices as discussed above.
- Clear Morphs: Clicking the Clear Morphs button resets all morphs. Use this option with care as it will undo all of your changes, even if you exit and resume using the Morphing Tool.
- Clear Pins: Clicking the Clear Pins button removes all pins previously applied to the current object.
- Exaggeration min/max: Exaggeration refers to the degree to which a morph target’s value will affect the vertices. The Exaggeration Min and Exaggeration Max values limit the extent of a morph target’s possible effect when the Morphing Tool is operating. No morph target can be modified beyond these limits (see Editing Parameter Dials for more information about parameter dial limits). Increasing these limits therefore increases the exaggeration effects of all morph targets. For a technical description of Exaggeration Min/Max, see the following note.
Mathematically, each morph target defines a displacement vector (v) on each object vertex, and its exaggeration value defines a multiplier (w). Thus, a morph target’s net effect is p + wv, where p is the original vertex position. If w=1, we add v+p. W can be any value. The larger w is, the more exaggeration this morph target’s effect has. The Exaggeration Min and Exaggeration Max values globally define the limits for w across all morph target weights when the Morphing Tool operates.
- Lock All: Clicking the Lock All button locks all morph targets, which disables morph-based shape changes. This is handy when you’re satisfied with your overall shape and only want to fine-tune a few specific morphs. In that case, you could use this option then unlock only those morphs you want to adjust.
- Unlock All: Clicking the Unlock All button unlocks all morph targets, allowing you to modify them.
To move in the Z axis, press and hold [COMMAND]/[CTRL] while dragging.
To use the Combine tab:
- Select the body part you wish to sculpt, then select the Morphing Tool. The Morph Editor palette appears. The Combine tab displays all of the morph targets available for the selected body part.
- The list of morph targets is hierarchical and displays branches containing the available morph targets. Clicking the – icon next to an expanded branch collapses that branch, and clicking the + icon next to a collapsed branch expands that branch. You can also use the scroll bars to navigate the list. The Morph Editor will allow you to manipulate all selected morph targets. A green dot next to a morph target includes the specified morph target when using the tool, and a Lock icon means the specified morph target will not be affected by the tool. Even if a morph target is enabled, it may or may not be affected by your use of the tool. For example, selecting a vertex in the forehead may affect the eyebrows but will not affect the mouth. Select your desired morph target(s), then click and drag any vertex on the selected body part.
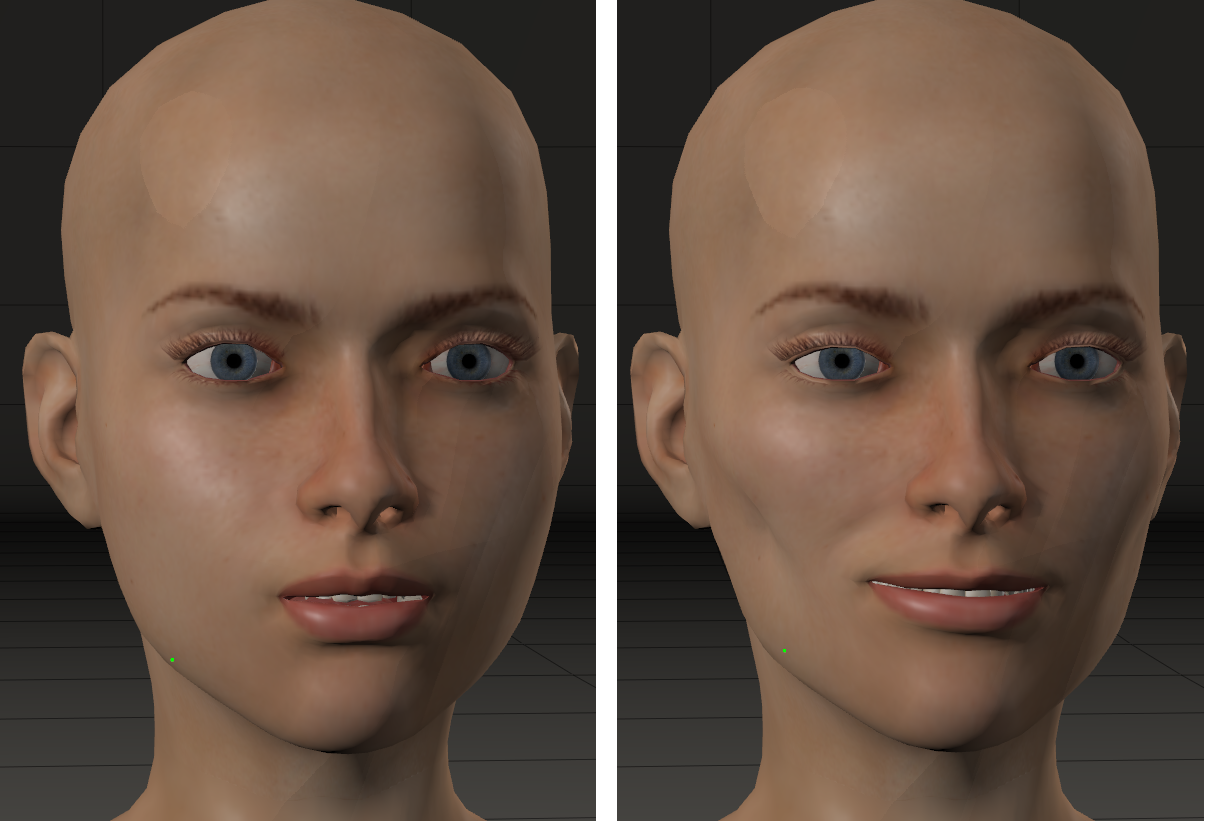
A face before and after using the Morphing Tool.
- Once you have a portion of the body part the way you want it, you can click the Pin button then click one or more vertices to pin them, preventing further manipulation as you work on other areas of the object. Pinned vertices appear as red dots on the current object and may move as you keep adjusting other portions of the body part (depending on how many morph targets affect the pinned vertex), however they will retain their current settings. Also, pins are retained if you stop using the Morphing Tool and resume using it later. To stop pinning vertices, click the Morphing button (see below). You may notice some trembling if you adjust morphs that affect pinned vertices.