Other Root Node Types
In addition to the three types of Material root nodes, Poser also offers root nodes that are specific to the background, lights, or atmosphere in your scene. These root nodes are described in the following sections.
Contents
Root Background Node
To display the root background node, choose the Background object from the Object selection menu in the material room Edit view.
The root Background node contains all of the attributes required to create a complete shader for your scene’s background and has the following attributes:
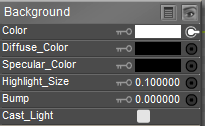
Root Background Node.
- Color: The Color attribute allows you to choose the background’s base color.
- Diffuse Color: The Diffuse_Color attribute is the surface color that is multiplied through any light striking the object.
- Specular Color: The Specular_Color attribute defines the color of the object’s highlight.
- Highlight Size: The Highlight_Size attribute defines the size of the highlight.
- Bump: The Bump attribute defines the amount of bump in the material.
- Cast Light: Check this option to allow the background to cast light (SuperFly renderer only)
Background Diffuse_Color, Specular_Color and Bump are not supported in SuperFly.
The final render will always display whatever is attached to the Color channel of the Root Background node. However, if you wish the same image or color to appear in the preview render, you must also attach it to the BG Picture or BG Movie node.
The Root Background node initially has five additional node types that are specifically designed to work with the Background root node.
BG Color
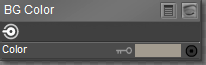
BG Color Node.
- Color: The Color attribute allows you to choose the background’s base color.
BG Environment
The BG Environment node is used to light your scene using an environment map image file as a texture. This node is the same as the Cycles > Texture > Environment Texture node discussed in EnvironmentTexture.
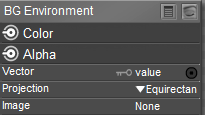
BG Environment Node.
- Color: RGB Color output, connect to the Color input of the Background root node.
- Alpha: Alpha output from the image. If the image has no alpha channel, output is white.
- Vector: Texture coordinate for texture look-up. If this socket is left unconnected, the image is mapped as environment with the Z axis as up.
- Projection: Choose Equirectangular (projects from an equi-rectangular photo) or Mirror Ball (projects from an orthographic photo or mirror ball).
- Image: Click to select your image source.
To see an example of this node in use, open either the Mondello Beach or Wide Street scene from the startup launcher. These scenes use the BG Environment node to project an image on to an environment sphere.
When the environment sphere is included in the scene, open the material editor and choose the Background object in the Material Editor. The preview window will display the HDRI image mapped onto the inside of the environment sphere. The following nodes are connected to the Background root:
- Add a Cycles > Input > TextureCoordinate node.
- Add a Cycles > Vector > Mapping node.
- Connect the Generated output from the TextureCoordinate node to the Vector input of the Mapping node.
- Set the Rotation value in the Mapping node to 0.000000, -1.570000, 0.000000
- Set the Scale value in the Mapping node to -1.000000, 1.000000, 1.000000
- Connect the Vector output from the Mapping node to the Vector input of the BG Environment node.
- Connect the Color output from the BG Environment node to the Color input of the Background root node.
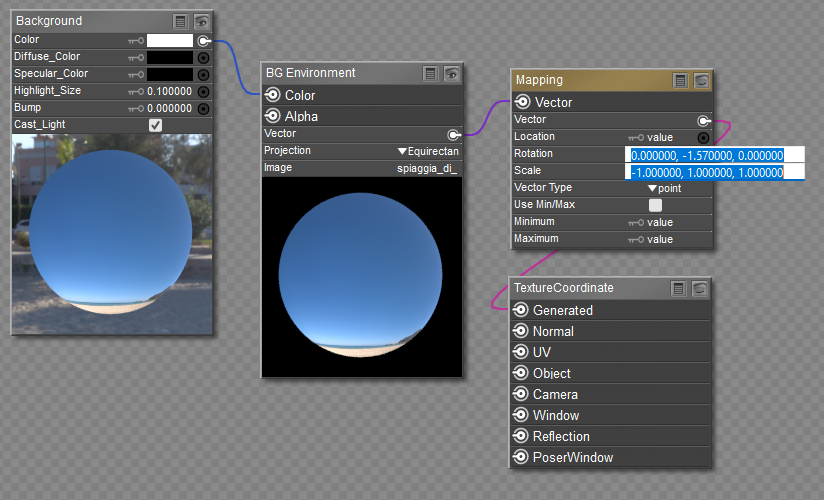
Environment sphere background shader.
Next, select the Environment Preview from the object menu in the Material room. The same image used in the Background is added to its default material to cast light into the scene. For this, you use an image map node with the same HDRI image assigned. The Color output of the image map is connected to the Emission connection in the Physical Surface root node.
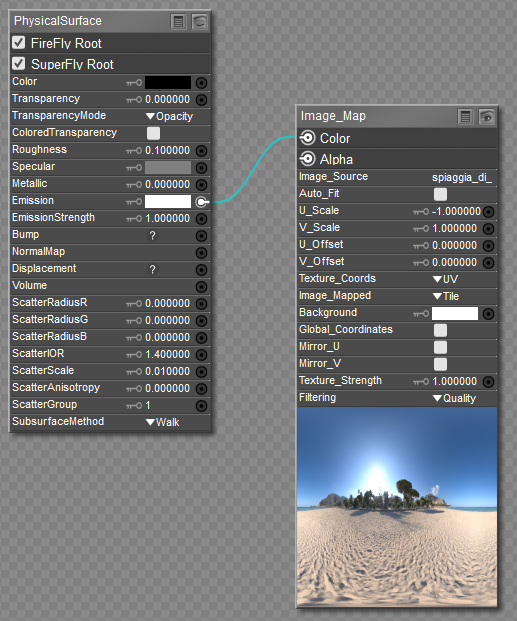
Environment prop emission shader.
Finally, select the Preview Light object from the Object menu in the material room. This is the third place where the HDRI image is referenced. The HDRI image map node is connected to the Color input of a root light node. Color is set to white, and Diffuse and Specular are set to black on the root light node.
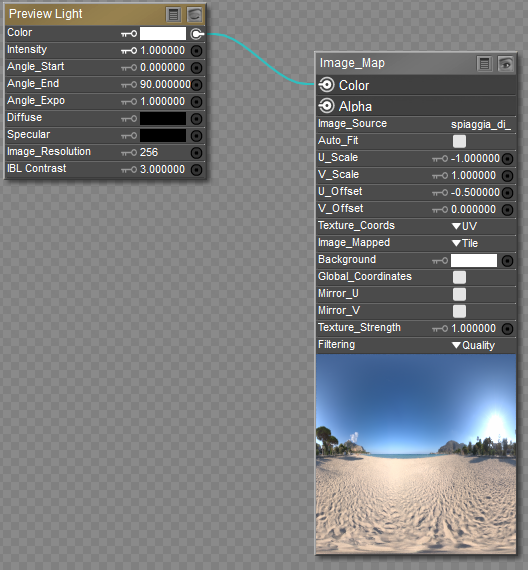
Environment preview light
Because the HDRI image is referenced in three places for the envirosphere, the easiest way to change the image used in this HDRI environment is as follows:
- Switch to the material room and select the Background from the list of objects at the top of the Material Editor.
- On the BG Environment node click the texture to open the Texture editor.
- Click the Browse button and select any HDR Image you want to use as an environment.
- Click the "Replace all identical maps" button at the bottom of the Texture manager.
- Choose to replace all identical maps in the Scene.
BG Movie
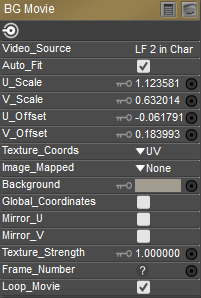
BG Movie Node.
- Video Source: Select the video source you want to use in the background.
- Auto Fit: Check this option if your video source is rectangular (non-square). The video will be stretched to match the aspect ratio of the movie you selected. The image will be scaled from its center.
- U Scale: Enter a scale factor for the width of the video. For example, if the width of the video is 20% wider than it is high (landscape style), enter 1.2 for the U scale value. The left side of the image remains in its original position, and the image will be scaled toward the right. If Auto Fit (above) is checked, you can leave this at its default value of 1.
- V Scale: Enter a scale factor for the height of the video. For example, if the height of the video is 20% higher than it is wide (portrait style), enter 1.2 for the V scale value. The bottom of the image remains in its original position, and the image will be scaled toward the top. If Auto Fit (above) is checked, you can leave this at its default value of 1
- U Offset: Enter an offset, in percentage, to position the movie lower (negative value) or higher (positive value).
- V Offset: Enter an offset, in percentage, to position the movie leftward (negative value) or rightward (positive value).
Importing movies with the File > Import > Background Movie command will automatically connect the BG Movie node to the Color output of the Background root node, and adjust the UV Scake and UV Offset settings as needed. to display the background movie at the correct aspect ratio.
- Texture Coords: Available texture coordinates are UV, VU, XY, XZ, ZY, and Mapper.
- Image Mapped: Available options are None, Alpha, Clamped, and Tile.
- Background: Click to choose a background color that will show through invisible (alpha) areas.
- Global Coordinates:
- Mirror U:
- Mirror V:
- Texture Strength: Click to specify the strength of the movie source. The default value is 1 which will be fully opaque. Values lower than 1 will be partially transparent, and rendered over the Color as set in the Background root node.
- Frame Number:
- Loop Movie: Check this option to restart playback of the movie from the beginning after it reaches the end. Uncheck the option to stop playback once it reaches the end.
BG Picture
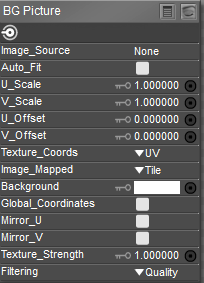
BG Picture Node.
- Image Source: Select the image source that you want to use for the background.
- Auto Fit: Check this option if your image source is rectangular (non-square). The image will be stretched to match the aspect ratio of the image you selected.
- U Scale: Enter a scale factor for the width of the image. For example, if the width of the image is 20% wider than it is high (landscape style), enter 1.2 for the U scale value. If Auto Fit (above) is checked, you can leave this at its default value of 1.
- V Scale: Enter a scale factor for the height of the image. For example, if the height of the image is 20% higher than it is wide (portrait style), enter 1.2 for the V scale value. If Auto Fit (above) is checked, you can leave this at its default value of 1.
- U Offset: Enter an offset, in percentage, to position the image lower (negative value) or higher (positive value).
- V Offset: Enter an offset, in percentage, to position the image leftward (negative value) or rightward (positive value).
Importing images with the File > Import > Background Picture command will automatically connect the BG Picture node to the Color output of the Background root node, and adjust the UV Scake and UV Offset settings as needed. to display the image at the correct aspect ratio.
- Texture Coords: Available texture coordinates are UV, VU, XY, XZ, ZY, and Mapper.
- Image Mapped: Available options are None, Alpha, Clamped, and Tile.
- Background: Click to choose a background color that will show through invisible (alpha) areas.
- Global Coordinates:
- Mirror U:
- Mirror V:
- Texture Strength: Click to specify the strength of the image source. The default value is 1 which will be fully opaque. Values lower than 1 will be partially transparent, and rendered over the Color as set in the Background root node.
- Filtering: The Filtering attribute allows you to select one of three options for texture filtering on the selected image map. These options are: None--no texture filtering; Fast--high-speed texture filtering; Quality--high-quality texture filtering; Crisp--provides more aliasing for increased crispness.
Black
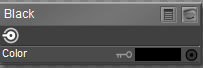
Black Node.
- Color: The Color attribute allows you to choose the background’s base color.
Root Light Node
A root Light node appears whenever you have a light selected. Each light in your scene has its own root Light node, which has the following attributes:
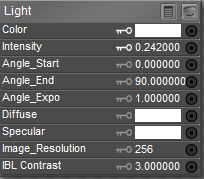
Root Light Node.
- Color: The Color attribute allows you to choose the light’s base color.
- Intensity: The Intensity attribute defines the light’s brightness.
- Angle Start: The AngleStart attribute defines the start of the light cone (in degrees) for spotlights.
- Angle End: The AngleEnd attribute defines the end of the light cone (in degrees) for spotlights.
- Angle Expo: The AngleExpo attribute controls how the light fades towards the edge of the light cone (falloff).
- Diffuse: The Diffuse attribute allows you to create lights that use only a diffuse component to light the scene.
- Specular: The Specular attribute allows you to create lights that use only a specular component to light the scene. You can create specular only lights by setting the color in the specular channel to black. You can also create a negative light source (a light source that darkens or negates certain colors in the areas of the scene lit by this light) by setting the Specular value to zero (i.e., black) and setting the light’s Intensity to -1. Then the Color and Diffuse channels can be adjusted to reduce certain aspects of light.
Light Diffuse Color and Specular Color are not supported in SuperFly.
- Image Resolution: The Image Resolution attribute specifies the width and height of the light probe to be sampled. You can attach a light probe of any size, and then adjust the resolution to suit your needs. Note that higher resolutions require more processing time, whereas with extremely low resolutions you will lose image quality. 256 is a reasonable default resolution for most light probe images.
- IBL Contrast: The IBL Contrast attribute allows you to modify the level of contrast in the incoming light probe image. The default value of 3 for this attribute is intended for use with Low Dynamic Range (LDR) images. For High Dynamic Range (HDR) images, the best IBL Contrast setting would be 1.
You must have a light selected in order to see its root node.
Root Atmosphere Node
The Root Atmosphere node contains all of the attributes required to create realistic atmospheric effects such as fog, haze, etc. in your scenes.
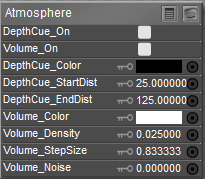
Root Atmosphere Node.
- DepthCue_On: Checking the DepthCue_On checkbox enables depth cueing, which varies all surface material colors from their original lit colors to the specified depth cue color (see below). This gives an effect similar to enabling the Depth Cueing option in the Document as described in Using Depth Cueing.
Depth Cue is not supported in SuperFly.
- Volume_On: Checking the Volume_On checkbox enables volumetric effects. You can enable depth cueing and/or volumetric effects individually.
- DepthCue_Color: The DepthCue_Color attribute specifies the color to use when applying the depth cueing.
- DepthCue_StartDist: The DepthCue_StartDist attribute specifies the distance from the current camera at which the depth cueing effect begins. This distance is not necessarily displayed in Poser distance units.
- DepthCue_EndDist: The DepthCue_EndDist attribute specifies the distance from the current camera at which the depth cueing effect ends. This distance is not necessarily displayed in Poser distance units.
- Volume_Color: The Volume_Color attribute specifies the color of the volumetric effect. This color is multiplied with the color of the lights in your scene. To use the lights’ colors for the volume, set this color to white.
- Volume_Density: The Volume_Density attribute controls the strength of the volumetric effect. This effect is multiplied by each light’s Atmosphere Strength attribute. If this attribute is set to 1.0, the selected light will cast atmospheric effects equal to this attribute and so forth. Please refer to Light Properties.
- Volume_StepSize: The Volume_StepSize attribute specifies the distance between rendering samples taken through the volume. Lowering this value increases the quality and requires increased render time.
- Volume_Noise: The Volume_Noise attribute adds a random factor added to the sample that can help balance out the effect of larger step sizes (see previous attribute).
You can connect nodes to the color and density attributes for more complex effects.
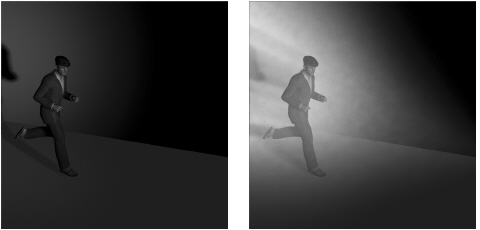
Without volumetric rendering (no fog) on left; With volumetric rendering (with fog) on right.
Bright infinite lights can wash out volumetric effects unless you use a very low density. Volumetric effects are most successfully used with both spotlights and carefully controlled density numbers. Also, Volumetric lighting effects only appear over a rendered object. They do not appear over an empty background, even when a background shader is in place. You need at least one object in on screen in order for volumetric lighting effects to be visible.