Kitty3 Textures-Principled
The material zones included in the "Kitty3" maps are as follows.
- Fabric Materials:
- Face: Carpet Velvet
- Metallic Materials:
- Bolts: Worn Steel
- DetalColor1: Solar Panel Blue
- DetalColor2: Solar Panel Violet
- DetalColor3: Solar Panel Light Purple
- DetalColor4: Solar Panel Medium Purple
- Eye Frame: Polished Chrome
- Emissive Materials:
- Eye Glow: Yellow Emissive
- Eye Inner: Yellow Emissive
- LED: Red Emissive
- Transparent Materials:
- Eye Glass: Clear glass
- Eye Shield: Gray Glass
- Face Shield: Gray Glass
Adding the Cycles Root, Principled BSDF, and Normal Map Nodes
To add the Cycles, Principled BSDF, and NormalMap nodes to the Kitty3 Textures, follow these steps:
- Choose one of the BodyColor materials you worked on in Kitty1 Textures-Principled.
- Shift-click to select the CyclesSurface, PrincipledBsdf, and NormalMap nodes. Then right-click over one of the selected nodes and choose Copy.
- Select the Face material in the material room.
- Collapse the physical surface node so that it's minimized as much as possible. This will give you room to add the Cycles Surface and Principled BSDF nodes.
- Right-click in empty space and choose Paste. The three nodes should be added to the nodes that are already there.
- Also paste the same three nodes into the Bolts, Eye Glow, and Eye Glass materials.
Paste the Cycles Surface, Principled BSDF, and Normal Map nodes into the Face, Bolts, Eye Glow, and Eye Glass materials.
Connecting the Nodes for the Face
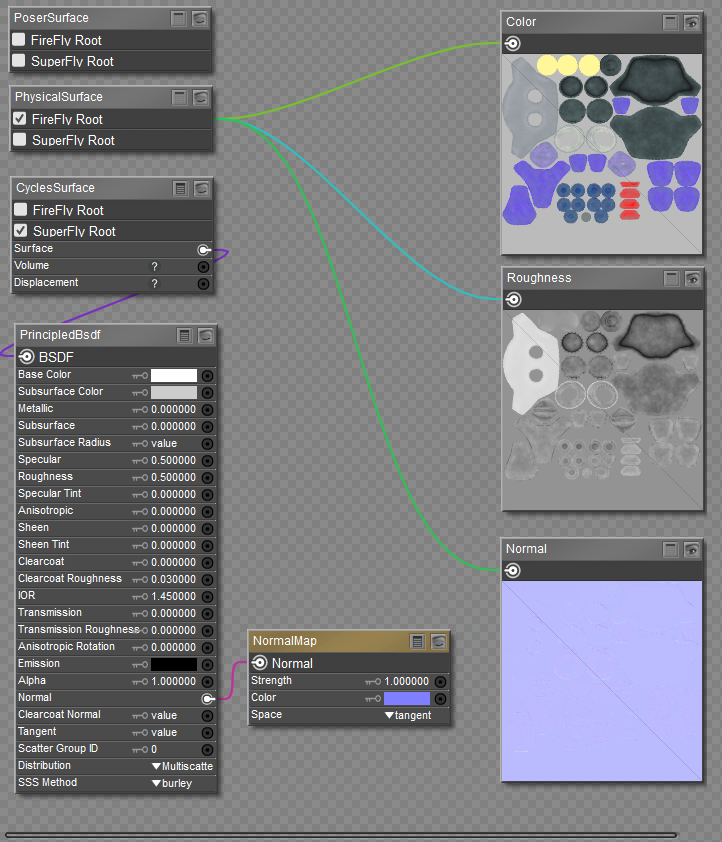
Connect the nodes in the Face material together as follows:
- Connect the output of the Color map to the Base Color input of the PrincipledBsdf node.
- Connect the output of the Roughness map to the Roughness input on the PrincipledBsdf node.
- Connect the Normal image map output to the Color input of the NormalMap node.
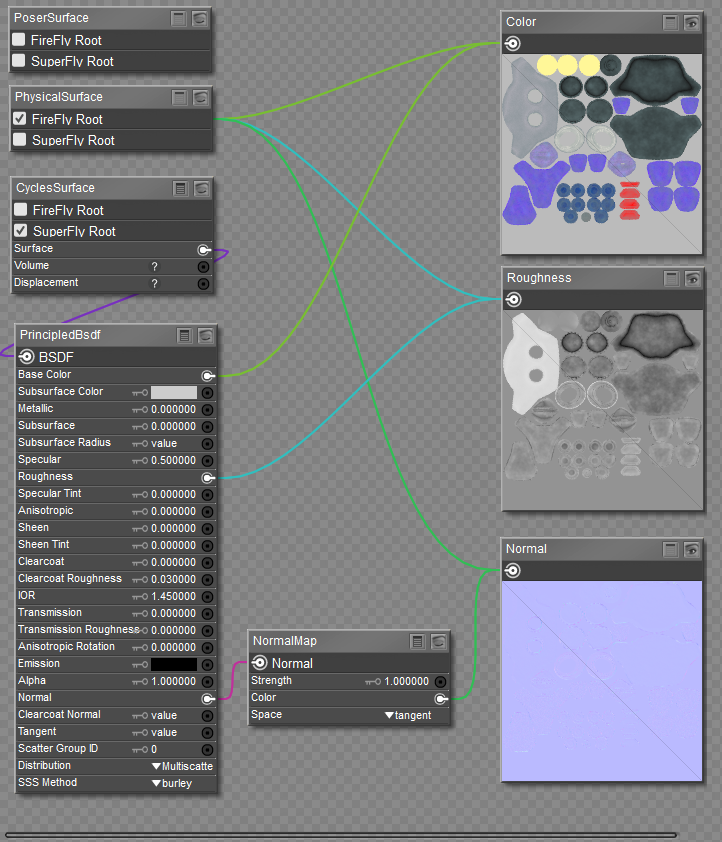
Face material connected to Cycles/Principled BSDF node.
Connecting the Nodes for the Metallic Materials
Connect the nodes for the metallic materials together as follows:
- Select the Bolts material.
- Connect the output of the Color map to the Base Color input of the PrincipledBsdf node.
- Connect the output of the Roughness map to the Roughness input on the PrincipledBsdf node.
- Connect the Normal image map output to the Color input of the NormalMap node.
- Connect the Metallic image map output to the Metallic input of the PrincipledBsdf node.
- Right-click in an empty space in the Edit workspace, and choose Select All to select all the nodes. Then right-click and choose Copy to copy them to your clipboard.
- Replace the DetalColor1, DetalColor2, DetalColor3, DetalColor4 and Eye Frame materials with the updated materials in your clipboard. (Select All, then Replace).
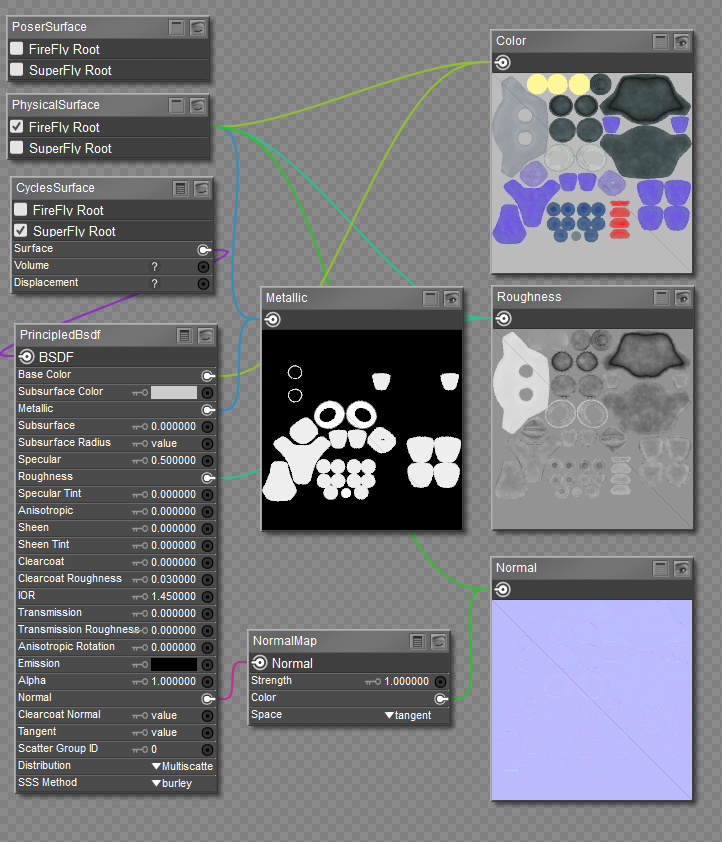
Kitty3 metallic materials connected to Cycles/Principled BSDF node.
Connecting the Nodes for the Emissive Materials
Connect the nodes for the emissive materials together as follows:
- Select the Eye Glow material.
- Connect the output of the Color map to the Base Color input of the PrincipledBsdf node.
- Connect the output of the Roughness map to the Roughness input on the PrincipledBsdf node.
- Connect the Normal image map output to the Color input of the NormalMap node.
- For the Emissive map:
- Right-click in an empty space in the Edit workspace and choose New Node > Math > Color Math.
- Set the Math Argument to Multiply.
- If you want to use a color other than the emissive color in the Color map, set the desired Emissive color in Value 1 of the Color Math node. If you prefer using the color in the image map, set the Value 1 color to white, and connect the output from the Color image map to Value 1 in the Color Math node.
- Connect the output from the Emissive color map to the Value 2 input of the Color Math node and set the Value 2 color to white.
- Connect the output from the Color Math node to the Emission input in the PrincipledBSDF node.
- Right-click in an empty space in the Edit workspace, and choose Select All to select all the nodes. Then right-click and choose Copy to copy them to your clipboard.
- Replace the Eye Inner and LED materials with the updated materials in your clipboard. (Select All, then Replace).
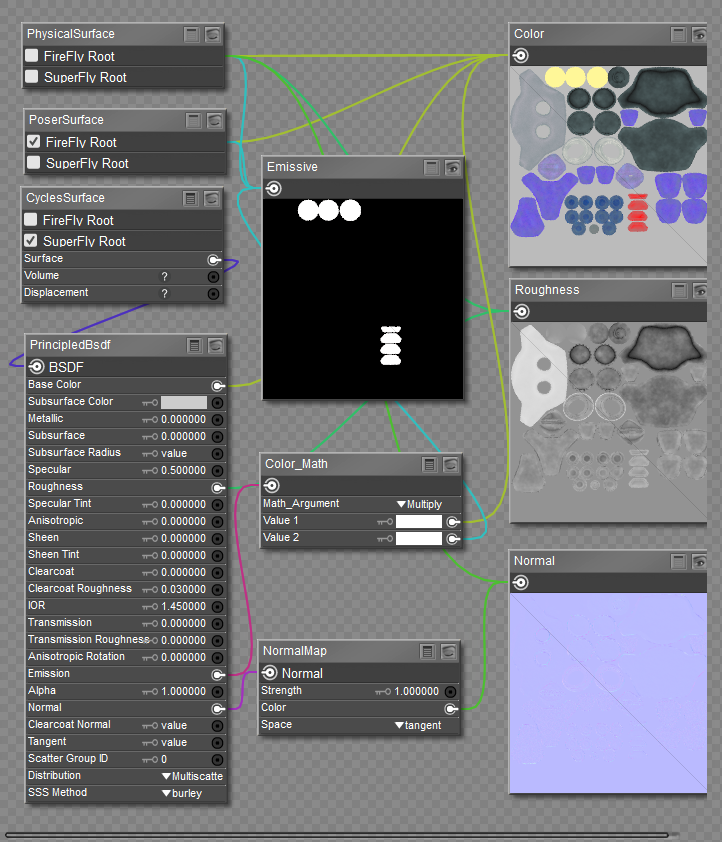
Kitty3 emissive materials connected to Cycles/Principled BSDF node.
Connecting the Nodes for the Transparent Materials
Connect the nodes in the transparents material together as follows:
- Select the Eye Glass material.
- Connect the output of the Color map to the Base Color input of the PrincipledBsdf node.
- Connect the output of the Roughness map to the Roughness input on the PrincipledBsdf node.
- Connect the Normal image map output to the Color input of the NormalMap node.
- To connect the Opacity map, do the following:
- Right-click in an empty space and choose New Node > Cycles > Shader > TransparentBsdf
- Right-click in an empty space and choose New Node > Cycles > Shader > Mix Closure
- Connect the output of the Opacity texture map to the Fac input of the Mix Closure node.
- Connect the output of the TransparentBsdf node to the Closure1 input of the Mix Closure node.
- Connect the BSDF output of the PrincipledBsdf node to the Closure2 input of the Mix Closure node.
- Connect the Closure output of the MixClosure node to the Surface input of the CyclesSurface node.
- Right-click in an empty space in the Edit workspace, and choose Select All to select all the nodes. Then right-click and choose Copy to copy them to your clipboard.
- Replace the Eye Shield and Face Shield materials with the updated materials in your clipboard. (Select All, then Replace).
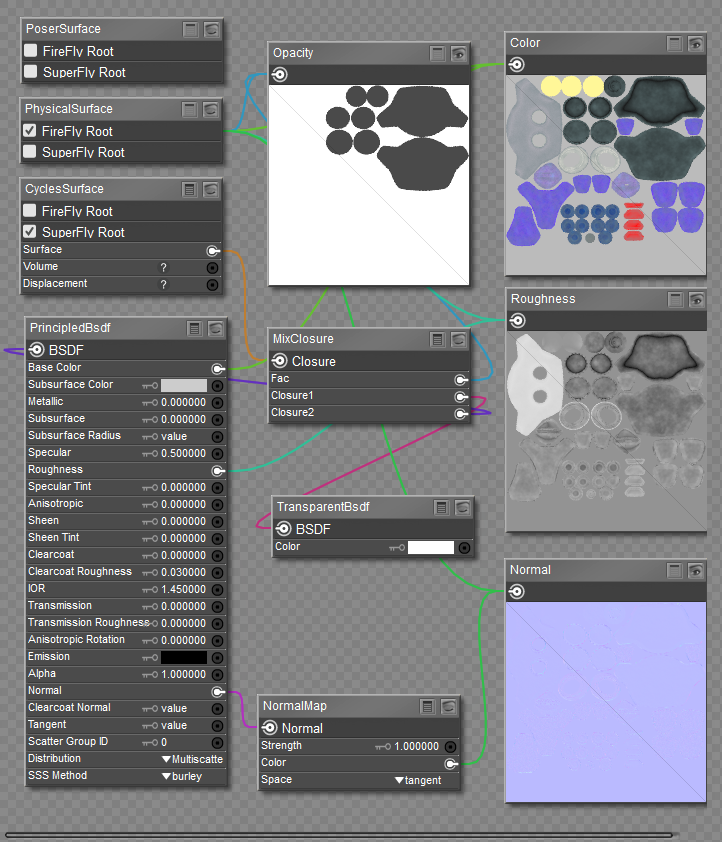
Kitty3 opacity materials connected to Cycles/Principled BSDF node.
This completes the changes for all materials in the Kitty. You might want to save your material to the Materials library after you are done. You will find a completed version of this texture in the Included > Runtime > Libraries > Materials > Toys > SAKitty Tutorial folder, named SAKitty-P12Cycles.