Creating Magnet Deformers
To create a magnet, select the object you wish to deform then select Object > Create Magnet. This creates three Magnet objects, which together comprise the deformer.
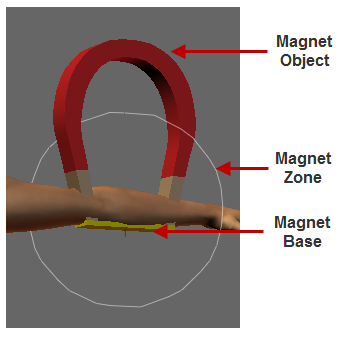
Parts of a magnet.
The three parts are:
- Magnet Object: The Magnet Object defines the behavior of the actual magnet.
- Magnet Base: The Magnet Base defines the zero point of the area to be deformed. Moving the Magnet Base moves the Magnet Object as well.
- Magnet Zone: The Magnet Zone defines the area being deformed. You can move and shape the Magnet Zone to suit your needs.
Magnets work by deforming the area within the Magnet Zone along the axis defined by the Magnet Base and Magnet Object in an amount dependent on the distance between the Magnet Object and the Magnet Base.
Using Editing Tools with Magnet Objects
To use Editing tools on a Magnet Object, select the magnet in the Current Actor pull-down menu, then select your desired Editing tool.
- Rotate: The Rotate tool rotates the Magnet Object around its three axes.
- Twist: The Twist tool rotates the Magnet Object along its own axis.
- Translate/Pull: The Translate/Pull tool moves the Magnet Object horizontally or vertically.
- Translate In/Out: The Translate In/Out tool moves the Magnet Object in or out from the center of the Poser workspace.
- Scale: The Scale tool increases or decreases the size of the Magnet Object.
Magnet Deformer Properties
Magnet Objects, Magnet Bases, and Magnet Zones have properties that you can edit using the Properties palette.
Magnet Object Properties
Magnet Objects have the following properties:
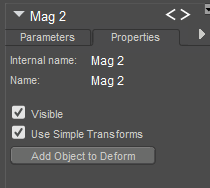
Magnet properties.
- Name: The Name property allows you to rename the Magnet Object by entering your desired name in this field.
- Visible: The Visible checkbox toggles visibility on and off. Checking the box makes the object visible, and vice versa. Invisible objects are not included in any render calculations, and do not appear in the rendered scene. See Figure Properties for information on animating the Visible property.
- Use Simple Transforms: This property is off by default. When the setting is off,
- This property corresponds to the transformPerVertex setting on the magnet. When this option is unchecked, Poser interpolates between the final vertex positions. When the option is checked, Poser interpolates transitions and rotations per vertex.
![]()
Magnet simple transforms.
- Add element to deform: Checking the Add element to deform button opens a hierarchy list, allowing you to select added elements to be deformed by the Magnet. This only works if the selected element(s) are within the Magnet Zone.
Magnet Object Parameters
Magnet Objects have the following parameter dials in the Parameters palette:
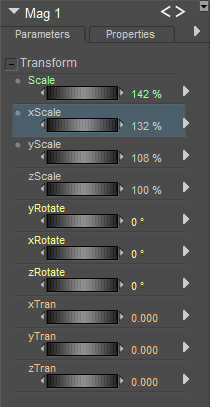
Magnet parameters.
- Scale: The Scale parameter dial increases or decreases the size of the Magnet Object in all axes.
- XYZScale: The xScale, yScale, and zScale parameter dials increase or decrease the size of the Magnet Object in the selected axis.
- XYZRotate: The xRotate, yRotate, and zRotate parameter dials rotate the Magnet Object around the selected axis.
- XYZTran: The xTran, yTran, and zTran parameter dials move the Magnet Object along the selected axis.
Magnet Base Properties
Magnet Bases have the following properties:
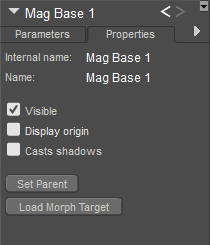
Magnet Base properties.
- Name: The Name property allows you to rename the Magnet Base by entering your desired name in this field.
- Visible: The Visible checkbox toggles visibility on and off. Checking the box makes the object visible, and vice versa. Invisible objects are not included in any render calculations, and do not appear in the rendered scene. See Figure Properties for information on animating the Visible property.
- Display Origin: The Display Origin checkbox displays the Magnet Base’s axes. This is useful because translations, rotations, etc. occur based on the Magnet Base’s axes, not the Poser workspace’s. See the Figure and Prop Editors for a discussion about local vs. global coordinates.
- Casts Shadows: Checking the Casts Shadows checkbox forces the selected body part to cast a shadow, which will be visible in your scene. Clearing this box means the selected body part casts no shadow.
- Set Parent: Clicking the Set Parent button allows you to make the Magnet Base a child of another element in your scene. Please refer to Poser File Types for a description of hierarchical relationships and to Changing a Parent for information on setting parents.
- Load Morph Target: Clicking the Load Morph Target button displays the Load Morph Target dialog, allowing you to load a custom morph target for the selected force field (which is then editable using the Morphing Tool as described in Creating Morphs with the Morphing Tool).
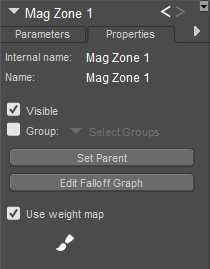
Magnet Zone Properties
Magnet Zones have the following properties:
Setting the Magnet Zone’s display style to Wireframe can help make it more visible in your Document.
Magnet Zone properties.
- Name: The Name property allows you to rename the Magnet Zone by entering your desired name in this field.
- Visible: The Visibility checkbox toggles visibility on and off. Checking the box makes the object visible, and vice versa.
- Group: Checking the Group checkbox enables grouping, allowing you to deform a grouped portion of the selected element(s). You can create groups to deform, and groups can consist of portions of one or more body parts, props, etc. Please see The Group Editor for information on using the Grouping tool. A group is selected when a checkbox appears next to the group listing.
- Set Parent: Clicking the Set Parent button allows you to make the Magnet Zone a child of another element in your scene. Please refer to Poser Figures Hierarchy for a description of hierarchical relationships and to Changing a Parent for information on setting parents.
- Edit Falloff Graph: Clicking the Edit Falloff Graph button allows you to edit the Magnet Zone’s Falloff graph, which determines where the deforming area ends or falls off. Please see Magnet_Zone_Falloff_Graph for information on using this graph.
- Use Weight Map: Check this option to use a weight map to control the amount that the vertices are affected. Click the Paintbrush icon to open the Vertex Weights palette so that you can edit the magnet zone weight map. Vertices in the weight map are initially set to 100% strength. The controls in the Vertex Weights palette are described in Painting Vertex Weights.
Magnet Zone Falloff Graph
Selecting Edit Falloff Graph in the Magnet Zone Properties palette opens the Magnet Zone Falloff window.
The left side of this graph depicts the center of the Magnet Zone, and the right side is its edge. By default, a smooth curve appears, meaning that the magnet’s influence gradually tapers off towards the edges of its zone. By adjusting this curve, you can alter the falloff properties.
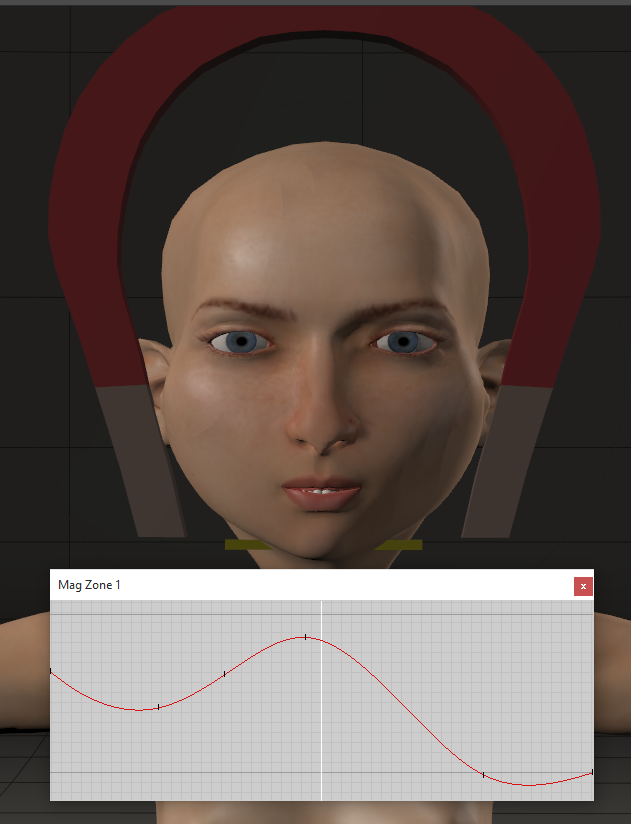
The effects of a magnet zone can be shaped with a graph.
To move control points click and drag them up and down. Raising a control point increases the magnet zone’s influence at the location. To add control points, click any spot along the curve. You cannot remove added control points.
Locking Magnets
You can lock magnets to prevent accidental changes. Please refer to Lock Object.