SuperFly Render Settings
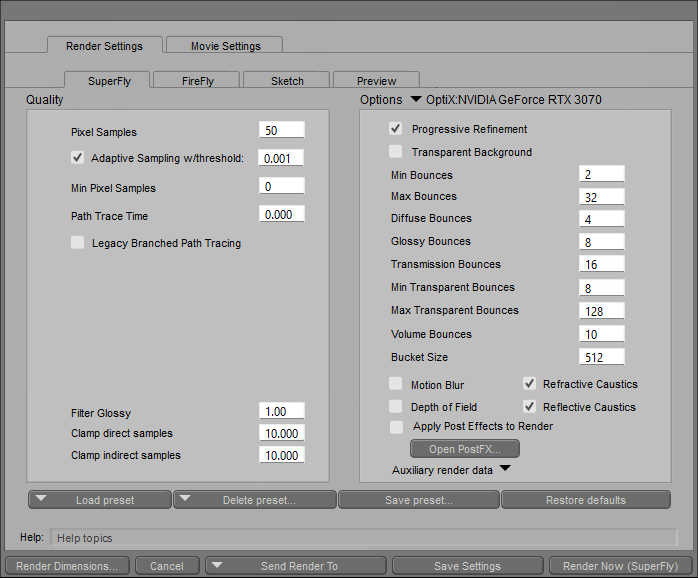
The SuperFly Render Settings dialog contains settings that control render properties and quality while using the Superfly render engine. In general, increasing the number of samples or the number of bounces that are taken during the rendering process increases the quality of the render; however higher settings also increase the amount of time required to complete the rendered image.

Render Settings: SuperFly tab.
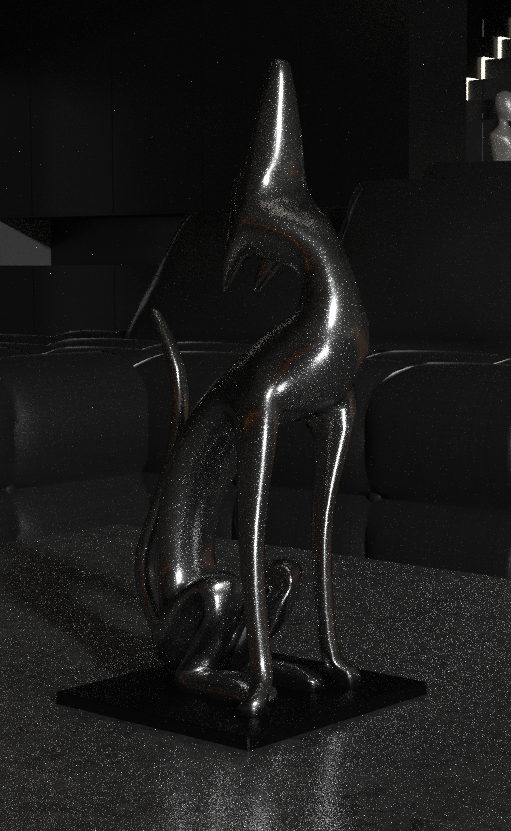
With default settings, you may see areas that don’t appear as sharp as they should, or which show some artifacts and blurriness in reflections. The quality settings will help you control how the light passes to and between the objects in your scene.

Default render settings.
- GPU Selection: Select the desired video card for SuperFly rendering from the GPU selection menu that appears above the options in the right pane.

GPU Selection options with CPU and one GPU

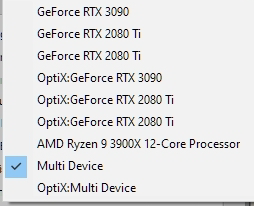
GPU Selection options with CPU and multiple GPUs
Windows Task Manager may not report GPU usage statistics properly. For more accurate results, we recommend using a graphics processing utility such as TechPowerUp GPU-Z (Windows only) or similar.
GPU renders perform better with large bucket sizes or progressive rendering. Small bucket sizes are better for CPU rendering.
When you have more than one GPU in your system, choose one of the following two render options to make use of multple GPUs while rendering, depending on whether or not your GPUs support OptiX rendering. As of this writing, only NVidia RTX 2000 and RTX 3000 cards support OptiX.
--- Choose Multi Device if at least one of your GPU cards does not support OptiX (for example, if you have a GTX1080, which does not support OptiX, and an RTX2080 which does support OptiX ).
--- Choose OptiX:Multi Device if all of your GPU cards support OptiX. In the example shown above, the RTX2080Ti and RTX 3090 are all OptiX capable cards.
SuoerFly requires a minimum compute capability of 2.0. Note that older NVIDIA GPU cards are more limited than current generations. For detailed information about NVIDIA CUDA support, see https://developer.NVIDIA.com/cuda-gpus.
Running SuperFly with a GPU has texture limits depending on model of card. On GTX4xx/5xx (Fermi-based) GPUs, the limit is 5 floating point textures (OpenEXR, HDR, 16-bit TIFF, etc) or 95 byte textures (JPG, PNG). On GTX 6xx (Kepler and Maxwell-based) GPUs, the limit is 145 textures.
Quality Settings:
- Pixel Samples: This setting is the one that determines the tradeoff between render quality and render speed. The pixel samples setting controls the number of paths to trace for each pixel. The value that you enter here will be squared to get the total number of primary rays. In other words if you enter a pixel sample value of 4, it will result in 16 primary ray traces, whereas a value of 24 will result in 576 ray traces. Higher values increase the overall quality of the render, but will also increase render times. Increasing the pixel samples reduces graininess in reflective and refractive light.
![]()
Pixel samples 4.
![]()
Pixel samples 40.
- Adaptive Sampling w/Threshold: Adaptive sampling helps speed up render times by examining changes as each render sample is made. It will move to the next bucket when it detects that any additional bounces will produce little to no change in the render quality of the current bucket. A threshold of 0 is a "brute force" method that will cut down render times the most. Non-zero settings may take a little longer than the brute force method but will be better quality. You can use adaptive sampling with CPU or GPU graphics cards. For some examples of render settings that use Adaptive Sampling, choose any of the following presets from the Load Preset button in the SuperFly tab (listed from lowest to highest quality render):
- CPU Fast, GPU Fast, OptiX Fast: Threshold set to .100
- CPU High, GPU High, OptiX High: Threshold set to .001
- CPU Medium, GPU Medium, OptiX Medium: Threshold set to .050
- CPU Timed 10 Second, GPU Timed 10 Second, OptiX Timed 10 Second: Threshold set to .000 (Path Trace Time is set to 10 seconds)
- CPU Ultra Caustics, GPU Ultra Caustics, OptiX Ultra Caustics: Threshold set to .001
The useful range of values in the UI will be 0.1 to 0.001 with 0.1 producing a very noisy render and 0.001 just rendering all samples and never reaching the threshold.
For reference in a simple scene a setting of 0.1 stops at about 25 samples which is equivalent to a setting of 5 samples in the render settings. A setting of 0.001 goes over 10000 samples which would be about 100 pixel samples on the settings tab.
- Min Pixel Samples: Sets a minimum value for the number of pixel samples
- Path Trace Time: Sets a maximum value in seconds for ray trace calculations
- Legacy Branched Path Tracing: See Using Legacy Branched Path Tracing
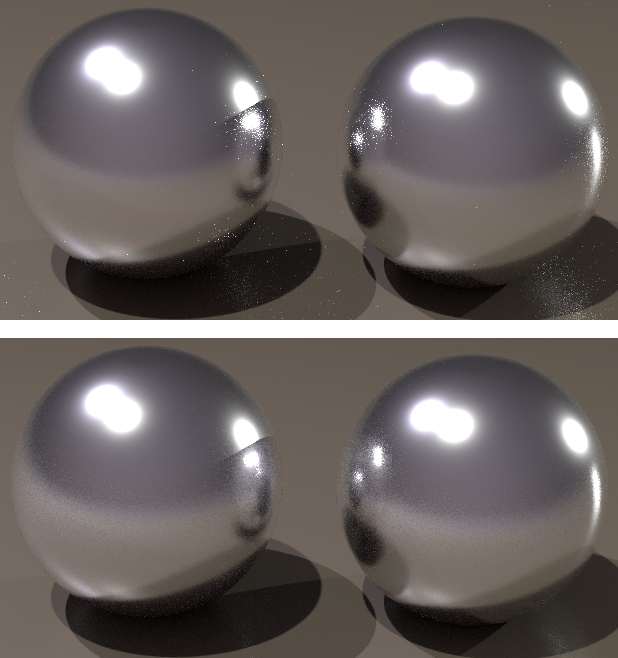
- Filter Glossy: Widens highlights in secondary reflections to reduce bright spots. It broadens specular highlights in secondary reflections (reflections of reflections), which softens them without a loss of energy. A setting of 0 turns glossy filtering off.

Filter Glossy of 0 (top) and 100 (bottom).
- Clamp direct samples: Sets a limit on the contribution of an individual sample. A setting of 1 means that an individual sample cannot contribute more than RGB 1,1,1 to a pixel (with 0,0,0 equaling black and 1,1,1 equaling white). Lower settings can improve antialiasing of overly bright areas in the image. but may visibly darken those objects when their visibility is blurry. A setting of 0 produces an unlimited contribution of direct samples, and is essentially the same as “HDRI optimized” FireFly. With Clamp direct samples set to 1, it operates similarly to FireFly with HDRI unchecked. The default of 10 is a compromise between preserving enough dynamic range for depth of field, and reducing dynamic range far enough to get decent antialiasing.
- Clamp indirect samples: Indirect light is light that bounces off of other objects in the scene, verses light that comes from a direct light source. This setting specifies a maximum limit on the number of indirect light rays that can be contributed, which can reduce noise in indirect light situations but can also reduce brightness. A setting of 0 produces an unlimited contribution of indirect samples.
The Filter Glossy, Clamp Direct Samples, and Claim Indirect Samples settings can be used to minimize hot pixels in the render. If they are set too low, the image will be visibly darker. If set too high, hot pixels may still persist.
Options:
- Progressive Refinement: When unchecked, SuperFly renders all passes of one tile at a time, and moves on to the next bucket after the current one is rendered at maximum quality. When the Progressive Refinement option is checked, SuperFly will render one pass of each bucket, one at a time. Each successive pass will increase the quality of the entire image. Generally, you check the Progressive Refinement option when you want a quick preview of how changes affect your scene. However, using Progressive Refinement for final renders will take longer to render than when leaving the option unchecked.
When using Progressive Refinement to preview your render settings, uncheck the Branched Path Tracing option, and set the pixel samples to a high value (such as 128). You can press the Cancel button at any time during the preview.
Progressive Refinement also works when using the Render in Background command.
- Transparent Background: Enable this option to force the background to be transparent. This will create an alpha layer in the image for compositing. If there is a background environment object such as the Construct or an envirosphere, you will need to make it invisible for transparent background rendering to work.
- Min Bounces: Controls the minimum number of total bounces. More bounces result in longer render times.
- Max Bounces: Controls the maximum number of total bounces. More bounces result in longer render times.
- Diffuse Bounces: The number of diffuse bounces controls the indirect diffuse light. A value of 0 means there is no indirect diffuse.
- Glossy Bounces: Controls the number of glossy bounces. More bounces result in longer render times.
- Transmission Bounces: Controls the number of transmissive bounces. More bounces result in longer render times.
- Min Transparent Bounces: Controls the minimum number of transparent bounces. More bounces result in longer render times.
- Max Transparent Bounces: Controls the maximum number of transparent bounces. More bounces result in longer render times.
The Max Transparent Bounces setting will help reduce render times in scenes that contain many layers of transparent materials (hair, leaves on trees, etc). Since each transparent layer is calculated during ray tracing, there is a potential of hundreds or even thousands of bounces to occur. Set the Max Transparent Bounces amount to at least the minimum number of bounces required to obtain desired render quality for multi-layered transparencies. Higher settings of 64 or more will reduce fuzziness in hair renders.
- Bucket Size: Smaller buckets use less memory. Larger buckets render the image faster.
When using GPU rendering, the Bucket Size setting will help to achieve optimal performance. Start with a bucket size between 100 and 300. Some scenes may benefit with larger settings.
- Volume Step Rate: The number of primary rays per pixel. Higher numbers increase the overall quality and render times.
- Volume Bounces: Controls the number of volumetric bounces. More bounces result in longer render times.
- Use Cache: When on, cached resources are used to speed render times. When off, all resources are loaded from disk each time you render.
- Motion Blur: Enables motion blur effect. The quality of the motion blur effect is controlled by the Pixel Samples setting.
- Depth of Field: Enables depth of field effect. The quality of the depth of field is controlled by the Pixel Samples setting.
- Refractive Caustics: Enables caustics caused by specular refraction.
- Reflective Caustics: Enables caustics caused by specular reflection.
Caustics are light rays that originate at a light source, and then are reflected or refracted off of a surface such as glass or reflective surfaces such as mirrors. Caustics are rendered in SuperFly only,
Caustics are best achieved when using area lights that are placed very close to the object or objects that you want to reflect or refract.
- Apply Post Effects to Render: Click the Open PostFX button to open the Post Effects dialog, described next in Applying Post Effects to Renders.
- Auxiliary Render Data: Allows you to export Normal, ZDepth, and Texture Coordinates layers to PSD files. See Rendering Layered PSD Files.
Four buttons appear beneath the render options to work with render presets:
- Load preset: Click this button to use a factory default or custom render preset.
- CPU presets include CPU Fast, CPU Fast Denoise, CPU High, CPU Medium, CPU Timed 10 Second, and CPU Ultra Caustics. These presets will use your CPU to render regardless of your video card.
- GPU presets include GPU Fast, GPU Fast Denoise, GPU High, GPU Medium, GPU Timed 10 Second, and GPU Ultra Caustics. These presets can be used with any video card that is Poser-compatible.
- OptiX presets include OptiX Fast, OptiX Fast Denoise, OptiX High, OptiX Medium, OptiX Timed 10 Second, and OptiX Ultra Caustics. These provide the fastest raytracing performance, but can only be used with video cards that are compatible with NVidia OptiX rendering (NVidia GeForce or Quadro RTX graphics cards with recent NVidia drivers).
- Manage presets: Click this button import, export, or delete render presets. Factory presets do not appear in the list and cannot be deleted.
- Save preset: Click this button to save the current render settings as a custom preset.
- Restore defaults: Click this button to revert render presets to default factory settings.