Parameter Dials
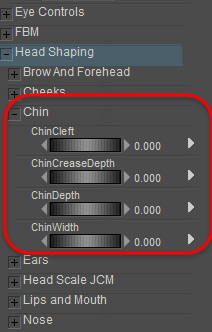
The parameter dials (4) in the Parameters palette let you pose a figure and adjust other attributes for figures, props, lights, camera, etc. using precise numerical increments. Each body part and most other elements in the scene have their own set of parameter dials. When an entire figure is selected, the displayed parameters affect the entire figure. To use a parameter dial, you can either click and drag it to the right to increase the selected value or left to decrease it. You can also click the displayed numeric value and manually enter your desired value using the text box that appears.

Parameter Dials.
To restore a parameter dial’s default (or last memorized) setting, press and hold [OPT]/[ALT] while clicking the desired parameter dial. To change a parameter dial’s default value, set the dial to your desired value and either select Edit > Memorize > Object, or use the Parameter Palette menu as described in Parameters Palette Options Menu.
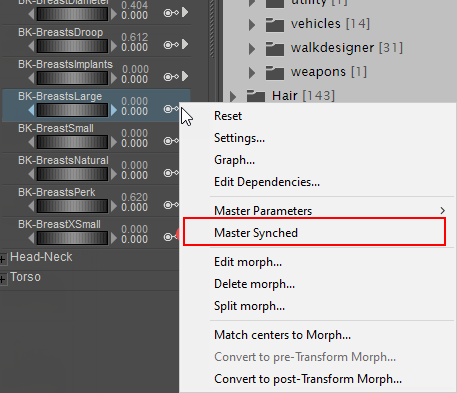
Each parameter dial has its own Parameter Dial menu (5), which is accessible by clicking the arrow to the right of your desired parameter dial. The Parameter Dial menu has the following options:
- Reset: Selecting Reset resets the parameter dial to its default or last-memorized value.
- Settings: Selecting Settings opens the Edit Parameter Dial dialog, described in the following topic.
- Graph: Selecting Graph opens the Graph palette for the selected element. Please refer to Using Graphs for more information about the Graph palette.
- Recalculate Dynamics: If you have a dynamic object selected (strand-based hair or dynamic cloth), selecting the Recalculate Dynamics option recalculates the dynamics for that object. Please refer to Step Four: Setting Hair Dynamics and to Step 4: Cloth Dynamics Controls for information about strand-based hair and cloth dynamics, respectively.
- Edit Dependencies: Opens the Dependent Parameters editor shown in the following figure.
- Master Parameters: Click to display a list of master parameters that utilize the current morph.
- Master Synched: In previous versions of Poser you had to switch to the Body actor to dial in a full body morph. You can now dial a full body morph from any body part. For example, you can select a figure’s left shoulder and dial the Voluptuous morph, and the value you dial in to the shoulder will also affect all other body parts that are affected by the Voluptuous morph. In cases when you need to dial full body morphs in for a single actor, uncheck Master Synched. The dial on that body part will now behave separately from the others.

Uncheck Master Synched to control a body part morph separately from its full body morph.
- Delete Morph: Deletes the morph target. You will be asked to confirm the deletion because it is a permanent deletion (you cannot undo this operation).
- Split Morph: When enabled, selecting Split Morph splits the currently selected morph into left and right sides, allowing you to apply the selected morph target asymmetrically. You can use this, for example, to introduce irregularities into a figure’s head, enhancing realism because no person’s head is perfectly symmetrical. Or, you can use it to create separate right and left eye blinks from a morph that closes both eyes at the same time. After choosing Split morph, enter the names for the left and right morphs in the fields provided (example: lEyeBlink and rEyeBlink) and choose OK to create the new morphs. The original Blink morph will also remain. Minimum and maximum limit settings will be carried over from the original morph to the right and left split versions.
- Match centers to morph: Automatically adapts joint centers and orientations to figures that are heavily morphed. For a complete description, see Morph Dependent Joint Centers.